


 Ultra subscription.

Whether you’re streaming gameplay, hosting a live podcast, or connecting with your community, YouTube Live makes it easy to share content and interact with viewers in real time.
You can livestream on YouTube in several ways, from broadcasting directly through YouTube Studio to using Streamlabs for extra customization and production tools. In this guide, we’ll walk you through four ways to go live so you can choose the setup that works best for you.
Before You Start: YouTube Live Streaming Requirements
Before you can start streaming on YouTube, make sure your channel is eligible for live streaming.
YouTube currently requires creators to:
- Verify their YouTube channel.
- Have no live streaming restrictions within the past 90 days.
- Be at least 16 years old to live stream independently.
- Enable live streaming on their channel, which can take up to 24 hours to activate for the first time.
If you plan to stream directly through the YouTube mobile app, you’ll also need at least 50 subscribers.
Note: The 50-subscriber requirement applies to YouTube’s native mobile live streaming feature. Requirements for third-party mobile broadcasting applications may differ depending on the streaming method.
We recommend completing channel verification at least a day before your planned broadcast to avoid delays.
For more information, review YouTube’s live streaming requirements.
Ways to Live Stream on YouTube
This guide covers four main methods. Each offers different features depending on your content and how much customization you need.
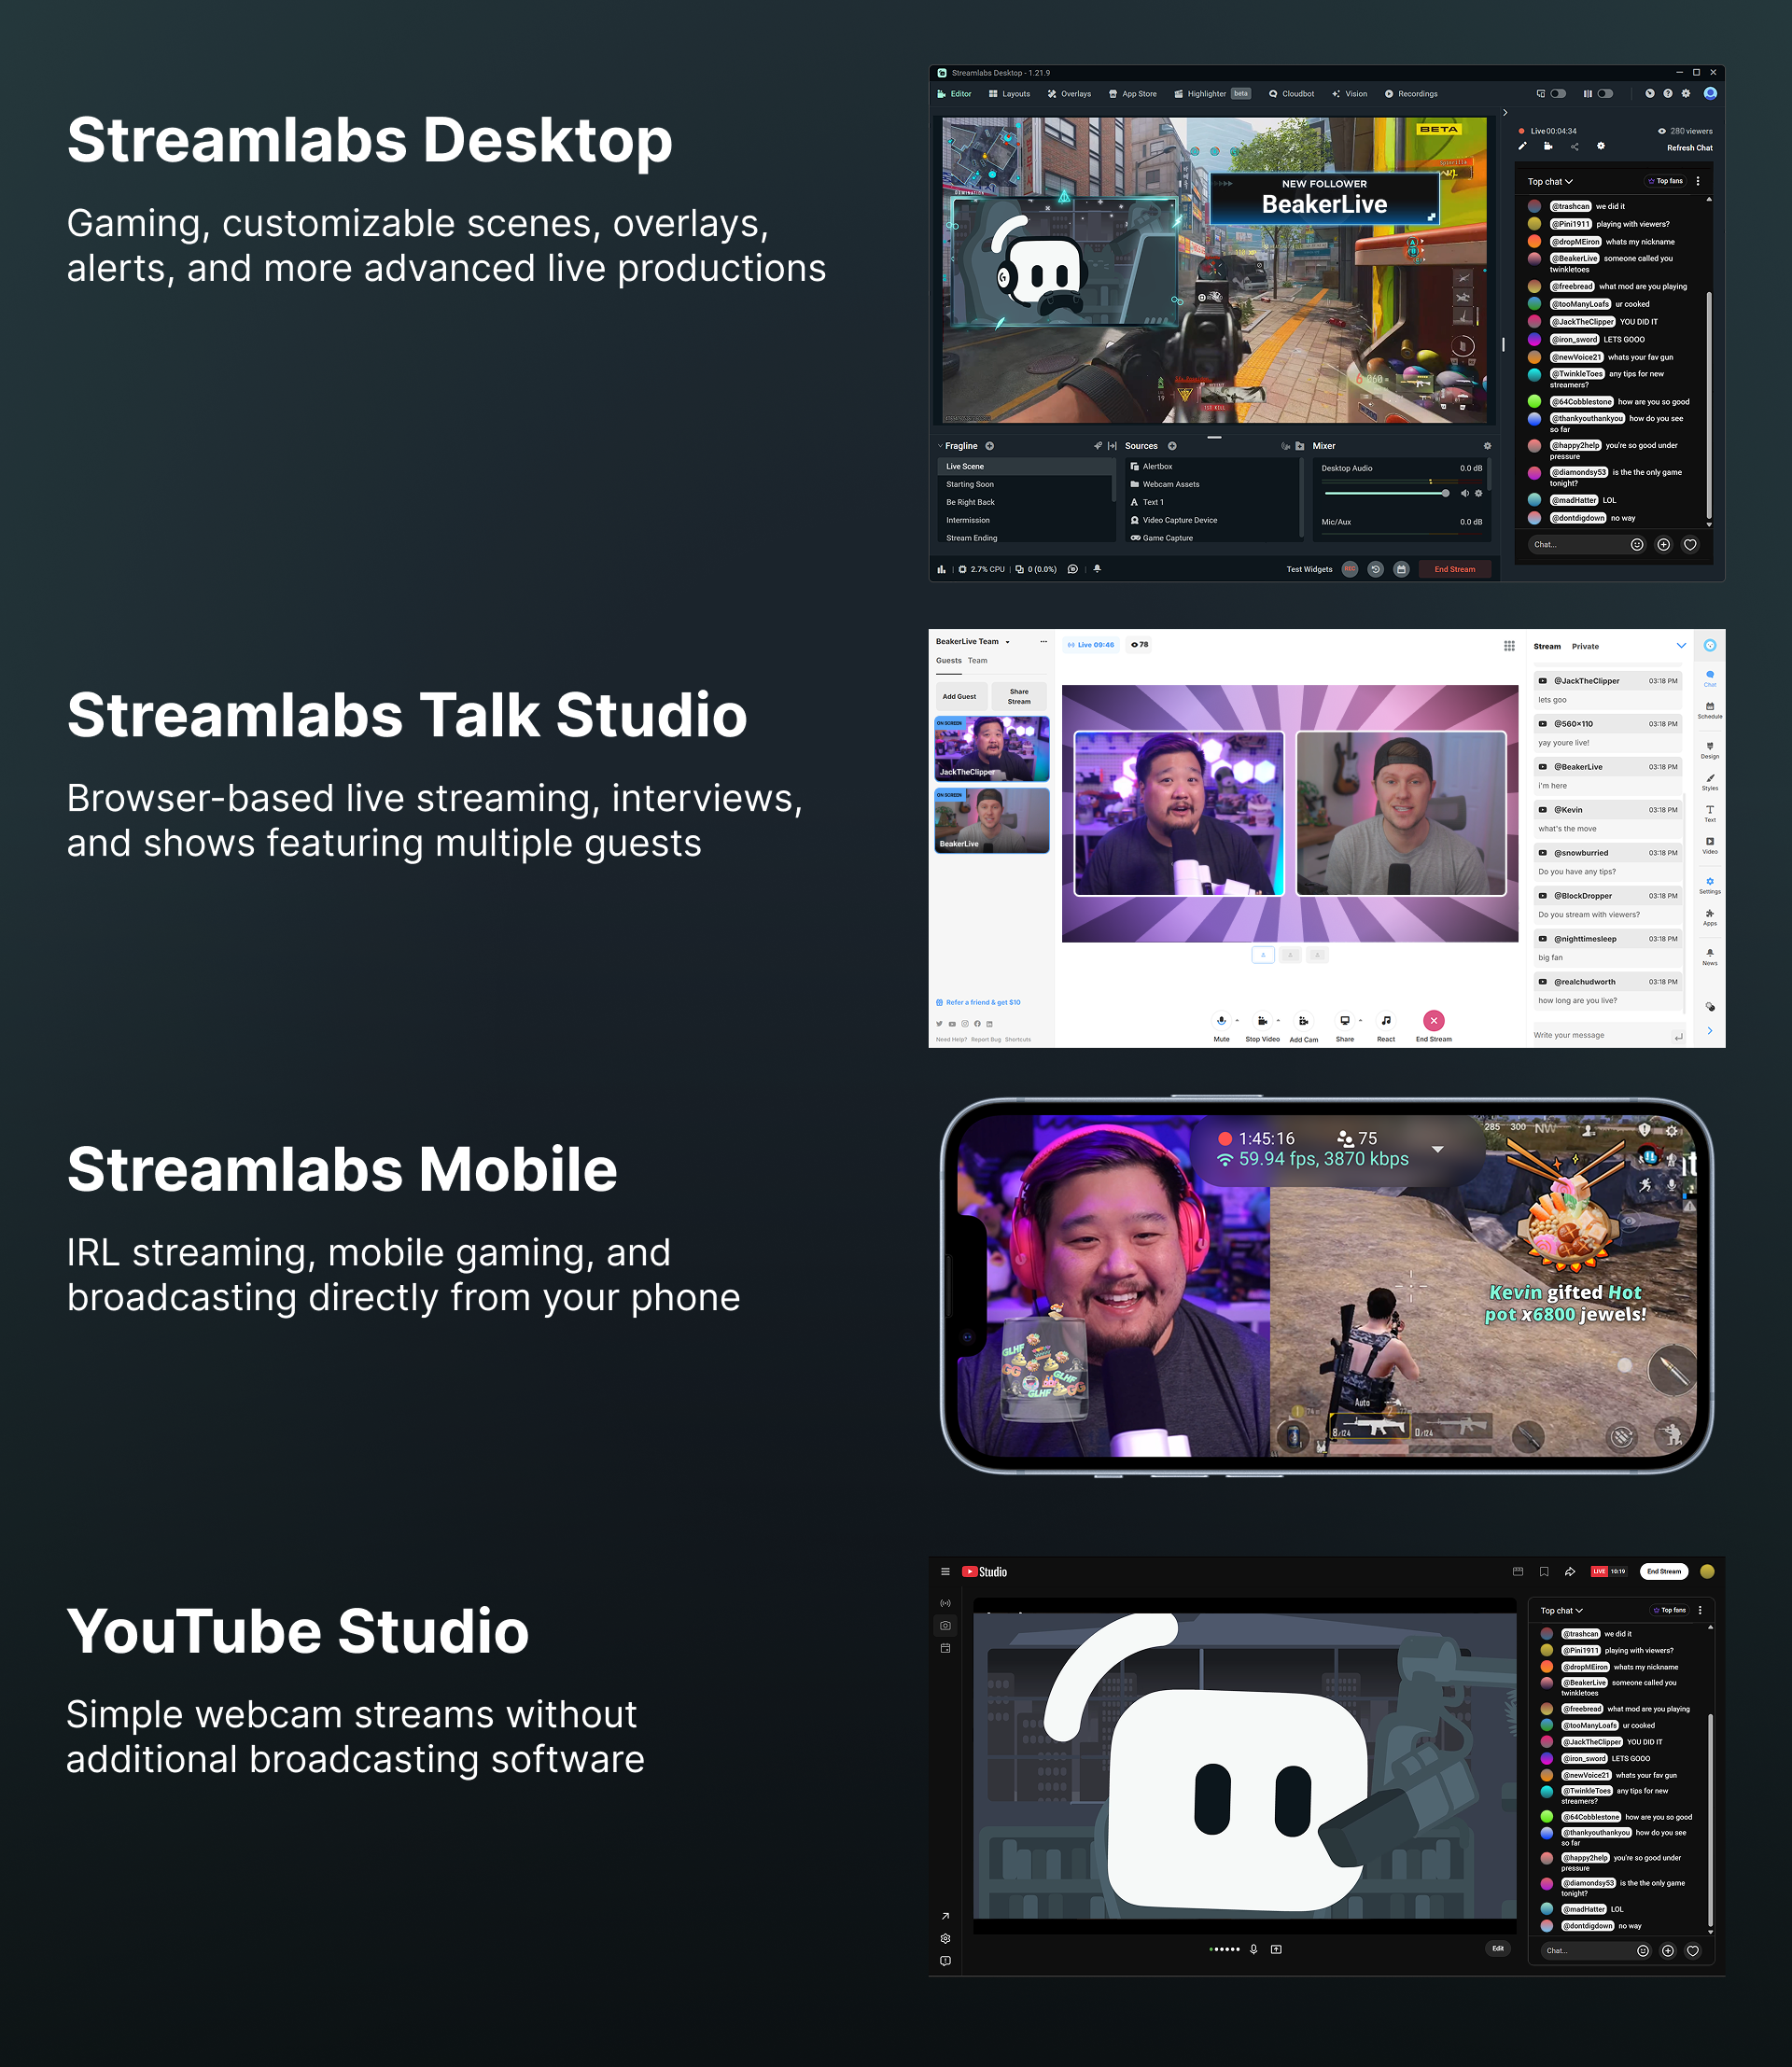
Let’s walk through how to get started with each option.
How to Live Stream to YouTube with Streamlabs Desktop
Streamlabs Desktop is a broadcasting software application that gives you greater control over your live stream’s appearance and production. You can customize your broadcast with overlays, alerts, multiple video and audio sources, and scenes that you can switch between while streaming.
Streamlabs Desktop also integrates directly with YouTube, allowing you to connect your account and go live without manually entering a stream key.
Step 1: Download and Install Streamlabs Desktop
First, download Streamlabs Desktop for your computer.
After installation, launch the application and connect your YouTube account by signing in with your Google credentials.
Follow the prompts to authorize Streamlabs Desktop to access your YouTube channel.
Step 2: Add Your Video and Audio Sources
Next, configure the sources you want viewers to see and hear during your broadcast.
In Streamlabs Desktop, locate the Sources panel and click the plus sign (+) to add a source.
Depending on your setup, you may want to add:
- Video Capture Device: Add a webcam or connected camera.
- Audio Input Capture: Add a microphone.
- Game Capture: Display gameplay from your computer.
- Display Capture: Share your computer screen.
- Window Capture: Show a specific application window.
Arrange your sources on the preview canvas to create your preferred layout.
Step 3: Customize Your Live Stream
One advantage of Streamlabs Desktop is its customization options.
Add overlays, alerts, chat widgets, and other visual elements to make your stream more interactive.
You can also create multiple scenes for different moments during your broadcast, including:
- Starting Soon: Let viewers know your stream is about to begin.
- Live: Display your primary gameplay, camera, or other content.
- Be Right Back: Show viewers that you’re taking a short break.
- Ending: Wrap up your broadcast before going offline.
To switch between scenes, select the scene you want to display from the Scenes panel.
Tip: Before going live, double-check which scene is selected. Your audience will see the active scene when your broadcast begins.
Step 4: Configure Your Stream Settings
Before broadcasting, review your video and audio settings to make sure everything is configured correctly.
You can adjust settings such as resolution, frame rate, encoder, and bitrate based on your computer and internet connection.
We recommend testing your microphone, camera, and other sources before starting your first live stream.
Step 5: Go Live on YouTube
Once your broadcast is ready:
- Click Go Live in Streamlabs Desktop.
- Select YouTube as your streaming destination.
- Enter your stream title and description.
- Configure any additional settings, such as your thumbnail and stream visibility.
- Click Confirm & Go Live to begin broadcasting.
That’s it! You’re now live on YouTube using Streamlabs Desktop.
Bonus: Stream Vertically and Horizontally with Dual Output
Want to reach viewers on both desktop and mobile?
Streamlabs Desktop’s free Dual Output feature lets you broadcast to YouTube in both horizontal and vertical formats at the same time.
Create separate layouts for each orientation to ensure your camera, gameplay, overlays, and other sources are properly positioned for each viewing experience.
To get started:
- In Streamlabs Desktop, open Settings and select Video.
- Enable Dual Output.
- Customize your horizontal and vertical layouts.
- Click Go Live, select YouTube, and choose Both as your broadcast orientations.
- Enter your stream details and click Confirm & Go Live.
This is particularly useful for creators who want to accommodate viewers watching traditional horizontal broadcasts and those who prefer vertical content on their phones.
Note: YouTube determines whether eligible vertical live streams appear in its vertical live feed. Broadcasting vertically does not guarantee distribution in that feed.
For more details, check out our guide to streaming vertically and horizontally on YouTube.
How to Live Stream to YouTube with Talk Studio
If you prefer streaming directly from your browser without installing desktop software, Talk Studio is another option.
Talk Studio is a browser-based broadcasting platform that lets you customize your live stream, add guests, and produce live content from your computer.
It’s particularly useful for interviews, podcasts, panel discussions, and other broadcasts involving multiple participants.
Step 1: Sign In to Talk Studio
Visit Talk Studio and sign in or create an account.
When prompted, allow your browser to access your camera and microphone.
Step 2: Set Up Your Broadcast
Once you’re signed in, you’ll see your broadcast studio.
From here, you can:
- Preview your camera and microphone.
- Customize your broadcast layout.
- Add text, backgrounds, and other visual elements.
- Invite guests to join your broadcast.
To add yourself to the live stream, hover over your camera preview and select Show on Stream.
If you’re inviting guests, use Add Guest to generate an invitation link.
Step 3: Connect Your YouTube Account
When you’re ready to configure your broadcast:
- Click Go Live.
- Select Add Destination if YouTube isn’t already connected.
- Choose YouTube from the available platforms.
- Sign in with your YouTube account and authorize the connection.
Step 4: Enter Your Stream Details
With YouTube selected as your destination, configure your live stream.
Enter your title and description, select the appropriate category, and choose your visibility setting:
- Public: Anyone can discover and watch your stream.
- Unlisted: Anyone with the link can watch your stream.
- Private: Only you and people you specifically invite can view the stream.
Once everything is set up, click Go Live to start broadcasting.
[Screenshot: Talk Studio stream details screen]
How to Live Stream to YouTube with Streamlabs Mobile
You don’t need a desktop computer to create engaging YouTube live streams.
With Streamlabs Mobile, you can broadcast directly from your iOS or Android device, making it a convenient option for IRL streaming, mobile gaming, and sharing experiences on the go.
Unlike broadcasting directly through YouTube’s mobile app, Streamlabs Mobile also provides additional customization options, including scenes, overlays, and alerts.
Step 1: Download Streamlabs Mobile
Download the Streamlabs Mobile app for iOS or Android.
Open the application and sign in to your Streamlabs account.
Step 2: Customize Your Stream
Before going live, use the app’s editing tools to configure your broadcast.
Customize your scenes, add overlays, and arrange elements to create your preferred layout.
If you’re broadcasting IRL content, make sure you’ve granted the application access to your camera and microphone.
If you’re streaming mobile gameplay, prepare the screen capture option instead.
Step 3: Connect Your YouTube Channel
When you’re ready to broadcast:
- Tap Go Live in the Streamlabs Mobile app.
- Choose whether to broadcast using your camera or share your screen.
- Choose YouTube as your streaming destination.
- Connect your YouTube account if you haven’t already.
Step 4: Configure Your Live Stream
Next, enter your broadcast details.
Depending on your setup, you can create a new YouTube live event or select an existing event.
Add your title, description, and other required information.
After reviewing your settings, tap Go Live to start streaming.
[Screenshot: Streamlabs Mobile stream information screen]
Bonus: Improve IRL Streaming Reliability with Network Boost
If you’re streaming while traveling or moving between locations, an unstable internet connection can interrupt your broadcast.
Streamlabs Mobile includes Network Boost, a feature for eligible Streamlabs Ultra subscribers that lets you use multiple available internet connections to improve stream reliability.
For example, Network Boost can combine Wi-Fi and cellular connectivity or use an additional phone as a relay device, reducing your dependence on a single connection.
Learn more in our Network Boost guide.
How to Live Stream Directly from YouTube Studio
For a straightforward way to broadcast from your computer without extra streaming software, go live directly through YouTube Studio.
This method suits basic webcam broadcasts that don’t require advanced production features.
Step 1: Open YouTube Studio
Visit YouTube Studio and sign in to your YouTube account.
Click Create in the upper-right corner and select Go Live.
Step 2: Select Webcam Streaming
In YouTube’s Live Control Room, select the Webcam option.
If prompted, grant your browser permission to access your camera and microphone.
Step 3: Enter Your Live Stream Details
Next, configure your broadcast information, including:
- Stream title and description.
- Audience settings.
- Visibility settings.
- Additional stream customization options.
You can also select your preferred camera and microphone.
Step 4: Preview and Go Live
Review your camera preview and make sure your audio is working correctly.
When you’re ready, click Go Live to begin broadcasting.
That’s all you need to start a basic YouTube live stream from your browser.
How to Stream Directly from the YouTube Mobile App
If your channel meets YouTube’s mobile live streaming requirements, you can broadcast directly from the YouTube app.
To get started:
- Open the YouTube app on your phone.
- Tap the Create (+) button and select Live.
- Add your stream details and configure your settings.
- Follow the prompts and tap Go Live when you’re ready.
This is a simple option for casual broadcasts, although Streamlabs Mobile offers additional customization and production features.
Frequently Asked Questions About YouTube Live Streaming
Do You Need 50 Subscribers to Live Stream on YouTube?
Not necessarily.
YouTube requires at least 50 subscribers to live stream directly from its mobile app. However, that minimum doesn’t apply to standard desktop webcam broadcasts or desktop broadcasting software like Streamlabs Desktop.
You must still meet YouTube’s channel verification, age, and account eligibility requirements.
Why Can’t I Go Live on YouTube?
If you’re having trouble starting a live stream, there are a few common issues to check:
- Your channel hasn’t been verified.
- Live streaming isn’t enabled yet. First-time activation can take up to 24 hours.
- Your channel has received live streaming restrictions.
- Your account doesn’t meet the requirements for the streaming method you’re using.
Review your channel’s eligibility in YouTube Studio or consult YouTube’s live streaming support documentation.
Can I Live Stream Vertically and horizontally on YouTube at the same time?
Yes. Streamlabs Desktop supports simultaneous horizontal and vertical streaming to YouTube using its free Dual Output feature.
You can customize separate layouts for each orientation and manage both broadcasts from Streamlabs Desktop.
Can I Stream to YouTube and Twitch at the Same Time?
Yes. Streamlabs supports multistreaming, letting creators broadcast to YouTube and other supported platforms at the same time.
Multistreaming to multiple platforms requires a Streamlabs Ultra subscription in applicable workflows.
Why Isn’t My Microphone or Camera Working?
If your audience can’t see or hear you, start by checking that your camera and microphone are connected and selected as the correct sources.
For desktop broadcasting software, review your source and audio settings. For browser-based streaming, make sure you’ve granted permission to access your camera and microphone.
It’s also worth closing other applications that may be using the same devices.
Ready to Go Live on YouTube?
Whether you’re broadcasting gameplay from your desktop, hosting a live interview, or taking your audience along on an IRL adventure, there’s a YouTube streaming setup for just about every type of creator.
For more control over your broadcast, Streamlabs offers desktop, browser-based, and mobile streaming solutions with tools to customize your content and engage your audience.
Explore Streamlabs for YouTube to find the tools that work best for your next live stream.