

Gameplay moves fast, and creators often miss moments that are worth celebrating and highlighting on stream.
With the NEW Game Pulse widget, creators don’t have to manually trigger scenes to highlight milestones like streaks and totals—such as eliminations, wins, kills, and more. The widget automatically triggers custom on-screen graphics and sound effects, making live streams feel more engaging without streamers ever having to lift a finger.
Available exclusively in Streamlabs Desktop, the Game Pulse widget uses Streamlabs’ AI vision model to react to in-game events in real time. A smarter way to boost audience engagement so creators can focus on streaming, gaming, and entertaining—not managing tools.
Jump Ahead:
- How to Set Up the Game Pulse Widget (Streamlabs Dashboard)
- How to Set Up Game Pulse in Streamlabs Desktop
Note: Game Pulse is a completely free widget available for Windows users only.
The Game Pulse widget was designed as a plug-and-play solution meaning you can set up the plugin once (or choose from default options) then get right back to gaming and live streaming.
How to Set Up Game Pulse in Streamlabs Dashboard
/How to Set Up Streamlabs Game Pulse Widget12.png)
Step 1: Log in to your Streamlabs Dashboard and search Game Pulse in the search bar (or click this link to go directly to the settings/setup page). Alternatively, you can customize the widget settings in Streamlabs Desktop using the steps in the next section.
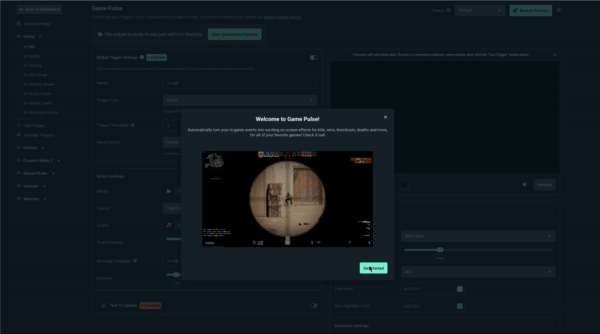
Step 2: When you first open Game Pulse, you’ll see a Welcome to Game Pulse popup. Click Get Started to jump right in!
Default options include:
- +1 Kill - triggered on every single kill
- +1 Victory - triggered on every single victory
- +1 Death - triggered on every single death
- Kill streak - 5 kills in a row with no deaths between
- Victory streak - 2 wins in a row with no losses between
- 5 Death count - 5 total deaths
- 5 Assist count - 5 total assists
- Knockout count - 5 total knockouts
Top Game-specific triggers for:
- Fornite
- Counter Strike 2
- Marvel Rivals
- Valorant
- Warzone
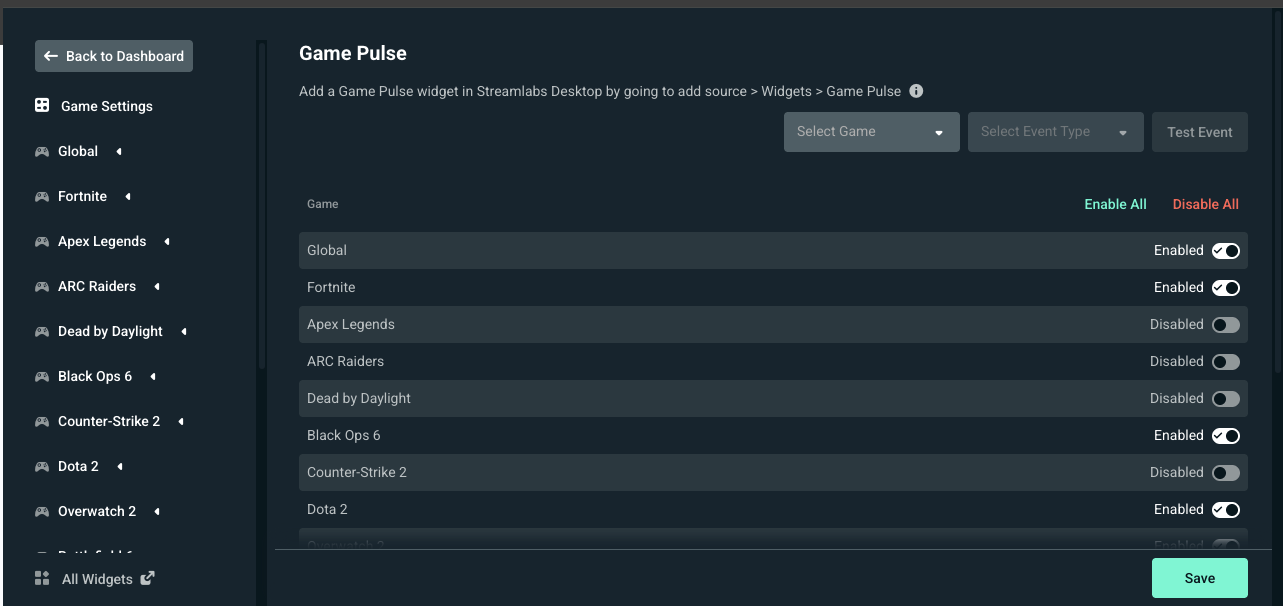
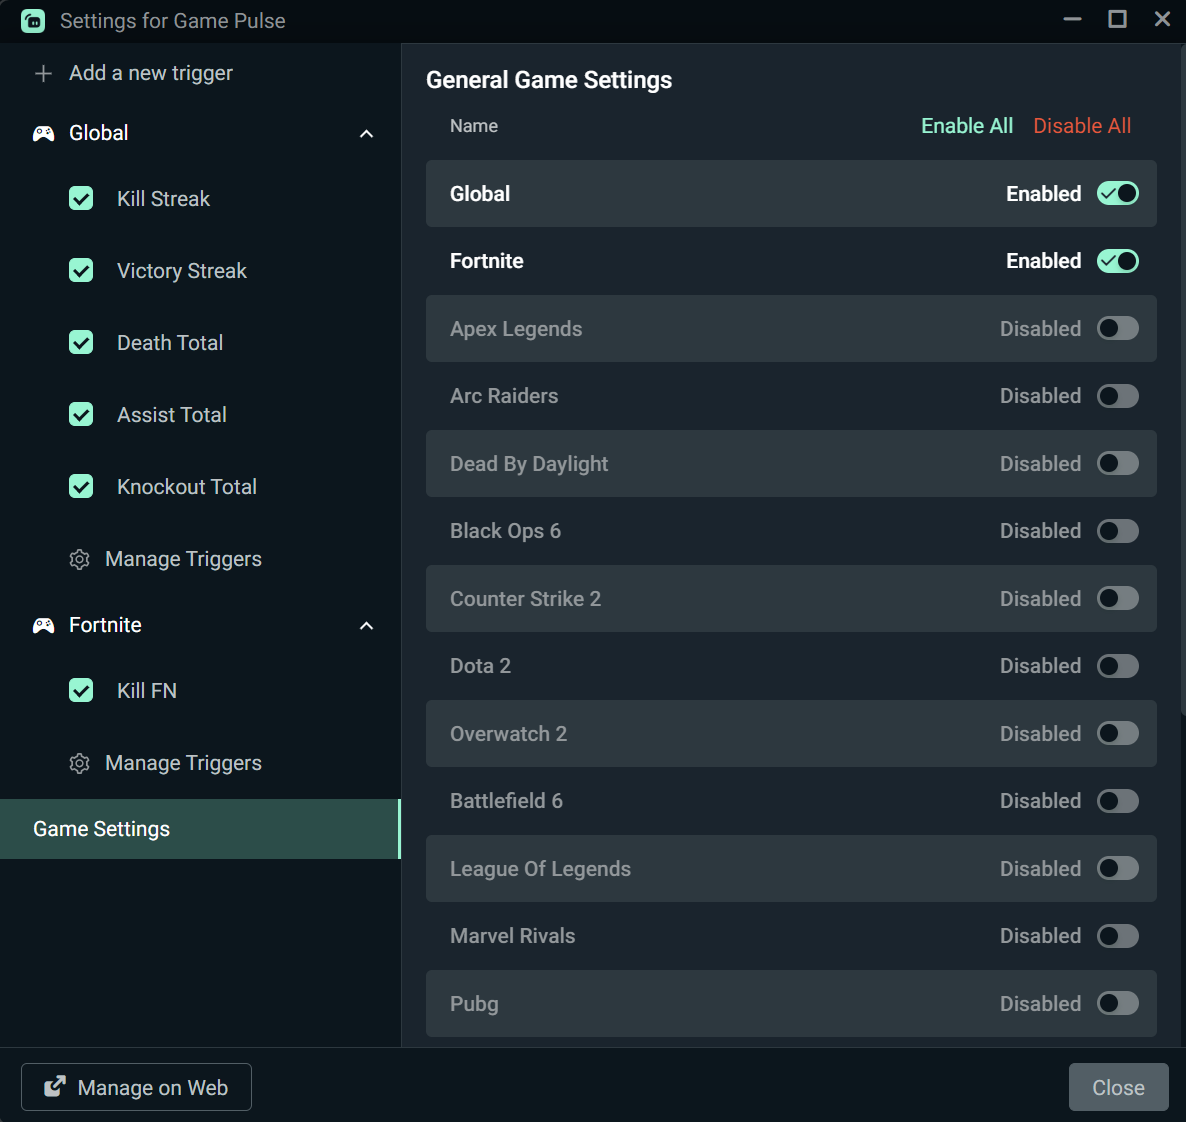
Step 3: Game Settings is the first thing you’ll find in the left navigation menu. Here, you’ll find a list of games that you can enable or disable.
Select Enable All or enable games individually using the respective toggle button. The selected games will be added to the left navigation panel for you to set up and control triggers.
Step 4: When building your own triggers, you can choose a Global Trigger which applies to all supported/enabled games or game specific triggers which will only apply to the selected game and will override any similar Global triggers. For example, if you had the following enabled:
- Global kill streak
- Fornite kill streak
The Fortnite streak will fire, not the Global when reaching a 5 kill streak. If you wanted the animations or customizations for Global to fire for your Fortnite game, disable the Fortnite toggle before playing/streaming.
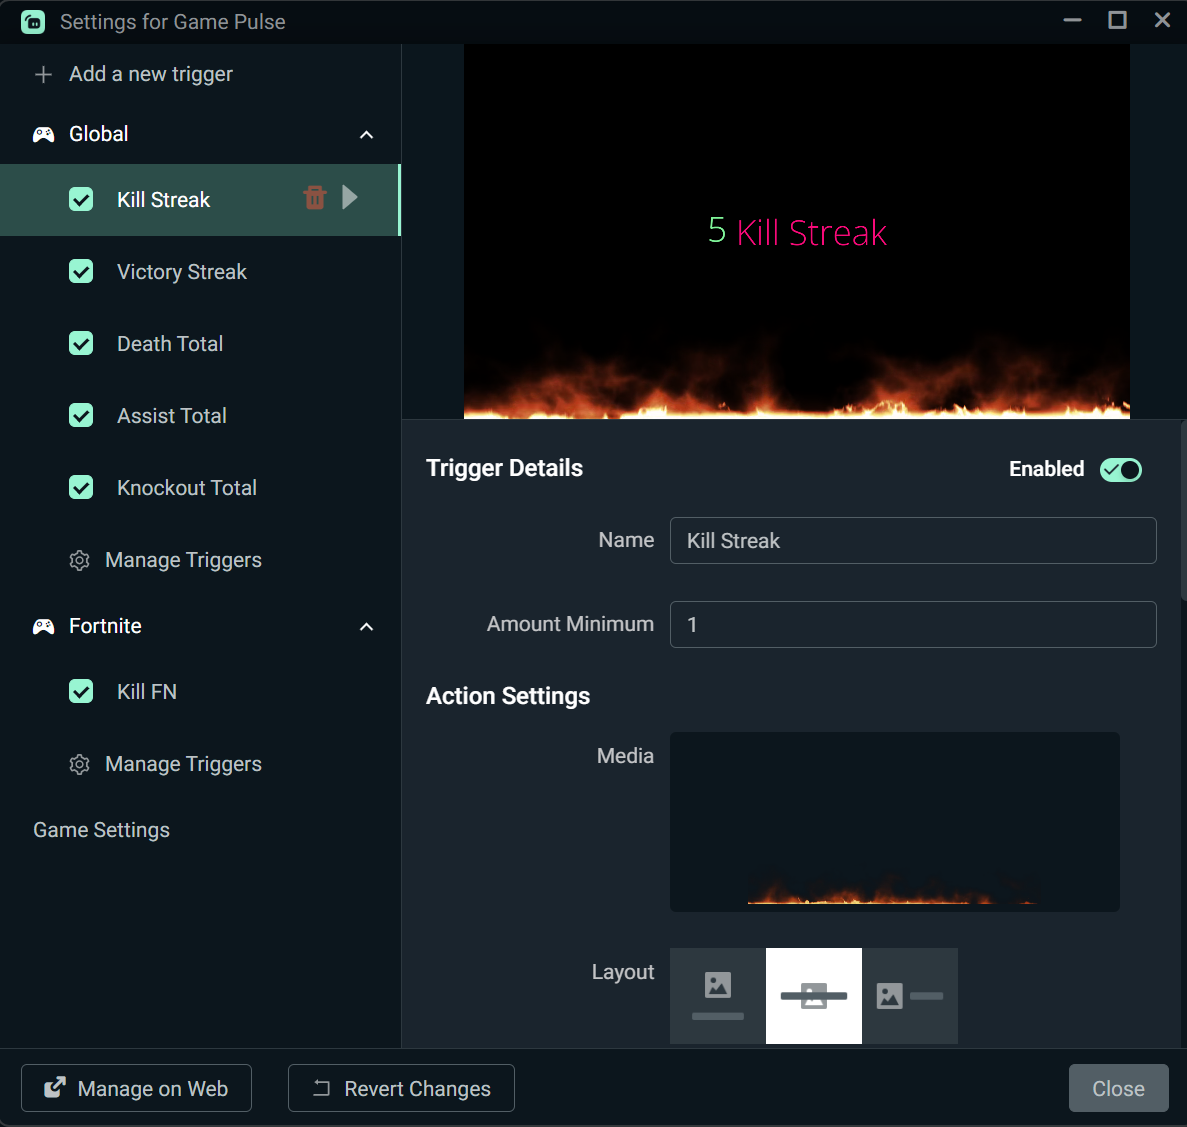
Step 5: Whether you’re creating a Global trigger or game specific one, you have to start with the trigger settings.
/How to Set Up Streamlabs Game Pulse Widget16.png)
/How to Set Up Streamlabs Game Pulse Widget7.png)
- Give your trigger a name
- Choose a trigger type from the dropdown (Streak or Total)
- Set a trigger threshold—the minimum of events required to trigger
Streaks vs. Counts
Streaks are tallied with the trigger event and opposing event. For example, if you have a 5 kill streak, then get 1 death, your kill streak will update to 4.
Counts are simply totals regardless of if an opposing event is triggered.
Step 6: Next, in your Action Settings you can customize how the trigger appears on stream.
- Media—Upload a graphic or image to play with your trigger or choose from options available in the Streamlabs Stock Library.
- Layout—Choose how you want text and images juxtaposed (i.e. Image Above Text, Text Over Image or Image to The Left).
- Sound— Upload a sound (mp3 file) to play with your trigger or choose from options available in the Streamlabs Stock Library.
- Message template—When your trigger fires, this will be how the accompanying message appears on stream.
- Duration—Choose how long you want your trigger to appear on stream (60 seconds max)
/How to Set Up Streamlabs Game Pulse Widget0.png)
/How to Set Up Streamlabs Game Pulse Widget9.png)
Pro-Tip: If you wish for your trigger to be spoken on stream in addition to your graphics and sound effects, enable Text to Speech, then select a voice and control the volume using the slider.
/How to Set Up Streamlabs Game Pulse Widget2.png)
Step 7: Advanced Settings where you can dig deeper into customization by tweaking your font and animation settings.
Font Settings

- Font—Choose from a selection of font types to match your styles and stream aesthetic.
- Font Size—Pick an appropriate font size for your text (100px max)
- Font Weight—Select the thickness of your font
- Text Color—Use the tool to find the perfect font color for your text or input a HEX code that matches your branding.
- Text Highlight Color—Choose a text color to highlight the number in your game pulse trigger. E.g. if you hit a 5 kill streak the number 5 will appear in the highlight color.
Animation Settings
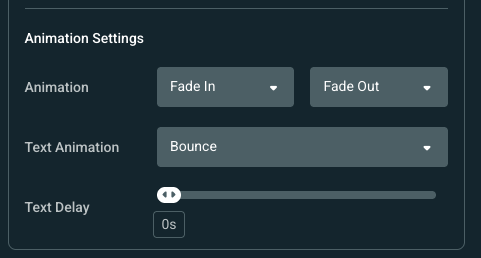
- Animation—Choose how your triggers appear and exit the screen. Fade In and Fade Out are selected by default so be sure to look through other options in the dropdown to see what’s available to you.
- Text Animation—Select how you wish your text to be animated on screen when triggered.
- Text Delay—Add a text delay (up to 20 seconds) if you want text to appear after your selected graphic and sound effect. Keep in mind that if your text delay is longer than your actual trigger, the text will not appear on stream.
Note: Previews will only show on Dashboard. To test in Streamlabs Desktop, save your settings then click the Test Trigger button below the preview window.
Step 8: When you are done customizing your trigger, click Save to store your settings. Repeat for as many triggers/game events that you wish then add the Game Pulse widget to your streaming canvas in Streamlabs Desktop (directions in the below section).
How to Set up Game Pulse in Streamlabs Desktop
Step 1: Open Streamlabs Desktop, go to your Sources panel, and click the + button.
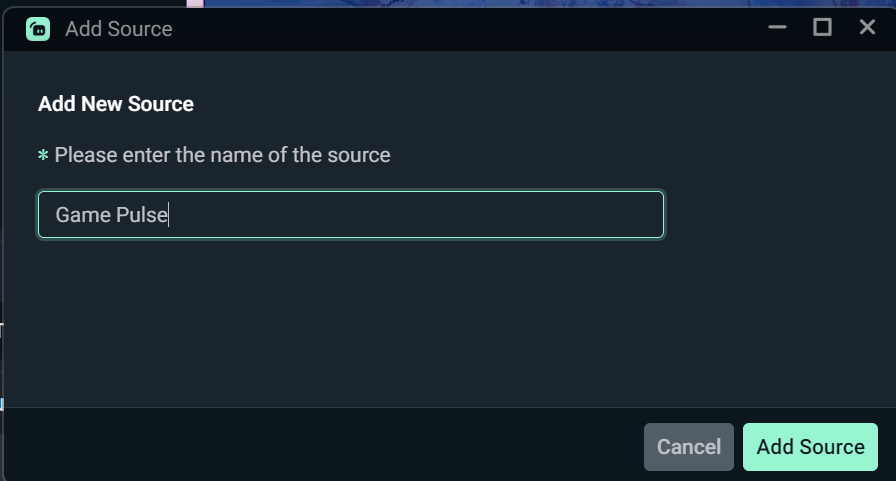
Step 2: Find and select Game Pulse, then click Add Source.
/How to Set Up Streamlabs Game Pulse Widget5.png)
Step 3: Next, name your widget (or leave the default) and click Add Source again.
Step 4: If you’ve already configured the Game Pulse widget in your Streamlabs Dashboard, those settings should carry over automatically. Otherwise, you can customize it in-app just like you would in the dashboard.
Below is a condensed version of how to customize your settings. Go back to the previous section for detailed step by step instructions.
- Trigger Settings—give your trigger a name, select a trigger type and set a threshold minimum
- Action Settings—Cusomtize how the trigger appears on stream via media, layout, sound, message template and the duration of the trigger on screen. Enable text-to-speech by selecting a voice and volume if desired.
- Advanced Settings—fully customize your font (type, size, weight and color) and animation settings (including animation type, text animation and text delay).
- Previews—Only show on Dashboard. To test in Streamlabs Desktop, save your settings then click the Test Trigger button below the preview window.
Step 6: Once you’re finished customizing your triggers, click the Close button to add the Game Pulse widget to your stream.
.gif)
Now, the Game Pulse widget is set up and added to your stream, so it can lock in on your gameplay while the widget automatically fires off visuals and sound effects powered by your gaming, not audience interaction.
If you have any questions or comments, please let us know by contacting us.