Our core goal at Streamlabs is to enable streamers to have the smoothest and most creative streaming experience, regardless of what platform they stream to or what other tools they find helpful. We don’t see this changing, and we believe that it’s important for us to offer the best possible experience with Streamlabs, regardless of where streamers prefer to broadcast.
We are currently exploring an integration with Kick.com to help streamline the go-live experience for creators on their website. Eventually, this integration will include login, alert, chat functionality, and more While we don’t have an estimated time of release yet, it is still possible to live stream to Kick using Streamlabs today. Today, we’ll show you how to go live to Kick and start streaming in just a few simple steps.
Step 1: Download and Install Streamlabs Desktop
The first step to live stream to Kick is downloading and installing the Streamlabs Desktop broadcasting software. Streamlabs Desktop is built on the core OBS engine under their public license (GPL) and is a free, open-source software that can help you set up your live stream, and add custom overlays, alerts, and more. Once you’ve downloaded the software, install it on your computer, and launch it.
Step 2: Set up Your Kick Account
After installing the software, you need to set up your Kick account. If you don’t have one yet, create and log in to your account.
Step 3: Create a Streamlabs ID
With Streamlabs ID, you can access all the creator apps Streamlabs offers, including Cross Clip, Talk Studio, Video Editor, Link Space, and more.
Creating an ID is a simple process that you can start by visiting our website and clicking “Login.”
For detailed instructions, whether you are a new streamer or an existing Streamlabs creator, visit our blog here.
Step 4: Find Your Stream Key and URL
Log in to your Kick.com account and head over to your creator dashboard.
- Click the Settings menu item
- Click Stream Key

Step 5: Add Stream Key and URL to Streamlabs Desktop
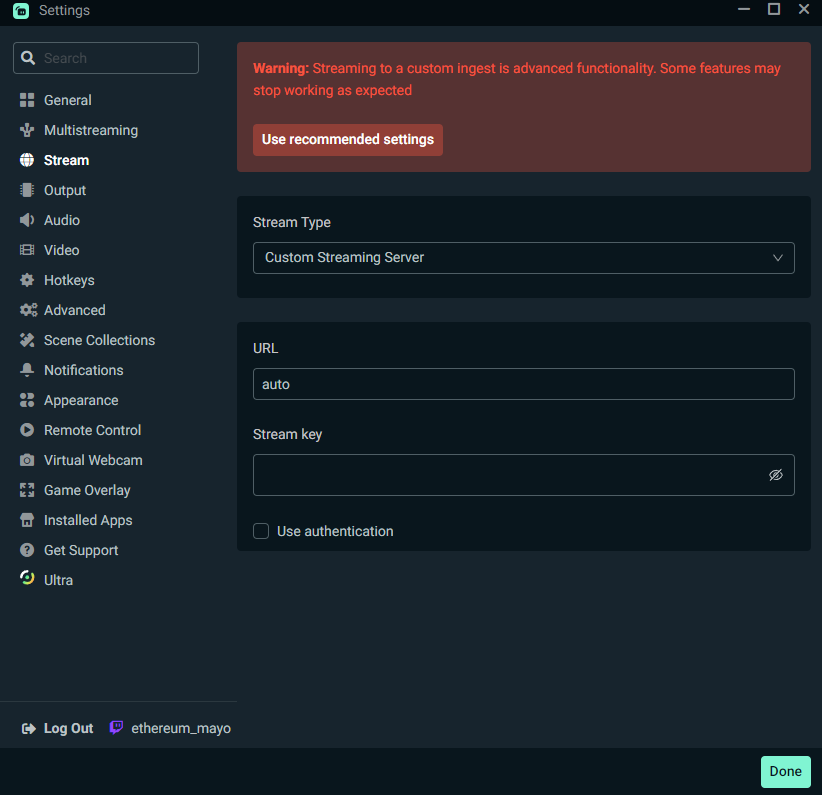
Open Streamlabs Desktop and navigate to Settings. Click Stream and change Stream Type to Custom Stream Site and enter the URL and stream key.

Step 6: Go Live
After configuring your settings, you’re now ready to go live. Visit Kick.com to see their recommended streaming settings.
Click on the Go Live button on the Streamlabs dashboard, and your live stream will start broadcasting on your Kick account.
Customize Your Stream
You can further customize your live stream by adding custom overlays, alerts, and more. We’ve integrated these features directly into Streamlabs Desktop, meaning you can access all of these options in one spot.
Bring Kick Chat into Streamlabs Desktop
Want to view your Kick chat in Streamlabs Desktop while you wait for a full integration?

To add Kick chat in Streamlabs Desktop:
- Go to Layout Editor.
- Add a Website element wherever you want your Kick chat to appear.
- Input https://kick.com/yourchannel/chatroom, replacing yourchannel with your channel name.
- Click Save Changes.
- Go live and enjoy reading Kick chat from Streamlabs Desktop.

In conclusion:
Live streaming to Kick using Streamlabs is easy and straightforward. By following the steps outlined in this article, you can start broadcasting your content to your audience and grow your online presence across other platforms. Remember to have fun, engage with your audience, and keep streaming!