Hopefully you’ve been following along with our Discord tutorials series and by now you know how to set up a Discord server, add bots, and make an announcement channel. Today we’ll show you how to add reaction roles to further customize your server.
What Are Reaction Roles?
By creating Discord roles in your server, you can choose to assign specific roles to certain people, the most common of which are “Admin,” “Mod,” and “Everyone” (i.e., everyone else). Some owners take it a step further and assign roles based on the theme of the server. Reaction roles, however, allow Discord users to self-assign roles. All users have to do is “react” to a post you’ve made and they can receive the role of their choosing.
For reaction roles, you’ll need a bot. While there are many different bots out there, we’ll be using Carl-bot for this tutorial.
1. Create Roles. 
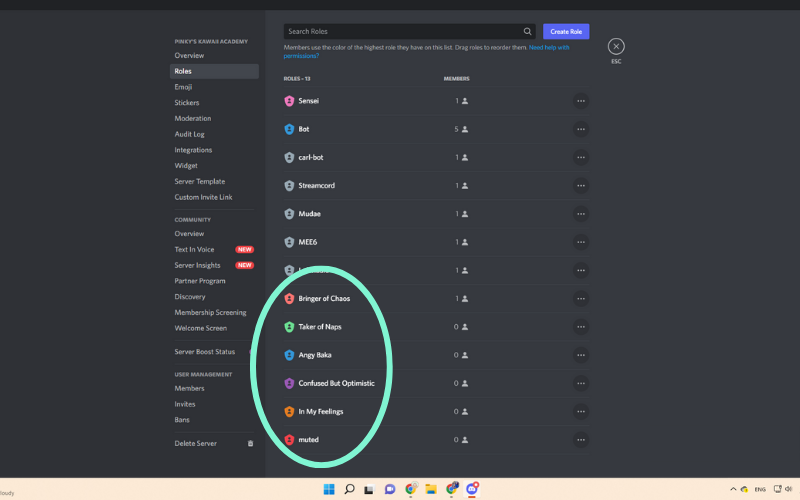
Before downloading the bot, first go into your “server settings,” then “roles.” Create some new roles for your server. We chose some funny roles for this tutorial but you can choose whatever roles work best with your server and its theme. One of the most common uses for reaction roles is to grant access to specific channels of the user’s choosing. If you intend to use reaction roles for that purpose, this is a great time to set up those permissions.
2. Download Carl-bot.

Select the option to log in with Discord to add Carl-bot to your server.
3. Authorize Carl-bot to join your server.

If you’ve already invited bots before, you’re likely familiar with this step.
4. Choose what permissions to give to Carl-bot.

5. Navigate to the “Reaction Roles” section and start adding your emojis.

When you first gain access to Carl-bot, it will have a short setup menu. There’s a section for “Reaction Roles,” but there aren’t a lot of options. If you skip through and make it to Carl-bot’s main page, you can choose “Reaction Roles” from the column on the left side of your screen. From there, start choosing which emoji you’d like to add to your roles. If you have custom emoji in your server, you’ll need to scroll down to the very bottom in order to find them.
6. Assign emojis to all of your roles, then click create.

7. Verify that your Reaction Roles message has been created.

As you can see, Carl-bot posted the reaction roles message but is requesting higher permissions. To grant these permissions, go to “Server Settings,” then “Roles,” and from there you can click and drag Carl-bot’s name. We placed our bots above everyone, mods, and admin but under the owner role.
8. Click on an emoji to react and enjoy your new role

If you click on any members of your server from the right side of the screen, you’ll be able to see their roles. If you want to group people into their roles rather than who is “online” and “offline” on the right side of the screen, be sure to check “Display role members separately from online members” for each role under the “edit role” settings.
Now that you know how to make reaction roles for your Discord server, what will you create?