

TL;DR
The Streamlabs Intelligent Streaming Agent is like having a whole production crew built right into Streamlabs Desktop. It can act as your virtual co-host, live producer, and tech assistant, helping you manage everything from scene switches and clipping highlights to real-time troubleshooting. The avatar is optional: choose between a 3D character on screen or run the Agent in voice-only mode for audio interactions. Both options come with co-host, producer, and tech support functionality.
Table of Contents:
- What Is the Intelligent Streaming Agent?
- Things to Know
- How to Set Up the Intelligent Streaming Agent
- Streamlabs Intelligent Streaming Agent FAQs
What Is the Intelligent Streaming Agent?
The Intelligent Streaming Agent brings studio-level production tools into Streamlabs Desktop without the heavy lifting. You can showcase the Agent on screen with a customizable 3D avatar that chats with you and reacts to your gameplay, or keep it working quietly in the background to handle tasks like scene switching, highlight capture, playing replays, and real-time troubleshooting.
The Intelligent Streaming Agent can act as a:
- Co-host: An on-screen virtual 3D avatar (optional) that can chat with you and react to gameplay in real time.
- Producer: Automates stream actions like scene switching, hiding sources, highlighting clips, or capturing replays.
- Tech Assistant: Monitors stream health, flags issues, and can answer troubleshooting questions on the spot.
Whether it's an avatar hyping you up after a win or keeping the energy up during awkwardly quiet moments, the Agent adapts to your stream style. This gives you more freedom to focus on creating content your viewers will love. The best part is that you can enable as many or as few of the features as you need.
Things to Know
- Currently the Intelligent Streaming Agent supports Fortnite, Valorant, PUBG, and Counter-Strike 2. We are working diligently to add more gaming titles.
- Free plan: Streamers get 100 interactions (responses by voice or text) and can have up to 5 automations active at once. Interactions do not reset monthly.
- Streamlabs Ultra subscribers: 1,000 interactions per calendar month plus 10 automations active at once.
- Automations like scene switching or clipping do not count toward interaction limits unless the Agent verbally/textually responds.
- Pairing the Agent with Streamlabs alerts and scenes is your best bet for the smoothest stream possible.
- You can make your stream even more engaging by incorporating reactive overlays that respond instantly to events in your game. These overlays use Streamlabs AI to understand what's happening inside your game and trigger overlay animations based on those events.
System Requirements
Below you can find the minimum system requirements to use the on-screen avatar. If you are using the agent in voice-only mode, you only need to meet Streamlabs Desktop minimum requirements.
Single PC Setup
- GPU:
- NVIDIA GeForce RTX™ 3090, 3090 TI, or 5090 or higher
- Quadro RTX™ 4000 or higher
- TITAN RTX™
- VRAM: 24GB for the full workload (Agent + avatar + production)
- Operating System: Windows 11
- Driver: We recommend always installing the latest NVIDIA Game Ready Driver
Dual PC Setup
- GPU:
- NVIDIA GeForce RTX™ 3060, 3080, 3080 Ti, 3090, 3090 Ti, 4070, 4070 SUPER, 4070 Ti SUPER, 4080 SUPER, 4090, 5070, 5070 Ti, 5080, 5090, or higher
- Quadro RTX™ 4000 or higher
- TITAN RTX™
- VRAM: 12GB
- Operating System: Windows 11
- Driver: We recommend always installing the latest NVIDIA Game Ready Driver.
Note: If you need help finding how much VRAM you have, check out our guide here.
How to Set up the Intelligent Streaming Agent
Excited to try out the Intelligent Streaming Agent on your next stream? Keep reading to find out how to install and set up your personalized Agent from customizing avatar personality settings to setting up automations and more.
Installing the Intelligent Streaming Agent
Step 1: Open Streamlabs Desktop and navigate to the App Store Home. Search for the Intelligent Streaming Agent app using the Advanced Search option at the top of the page or click this link to view the app from your browser.
Step 2: Click Install. If installing from the browser link, click Open Streamlabs Desktop when prompted.
Note: Streamlabs AI is required to run the Intelligent Streaming Agent. If prompted, install Streamlabs AI to continue.
Step 3: After installing, click on Intelligent Streaming Agent in the navigation panel on the left.
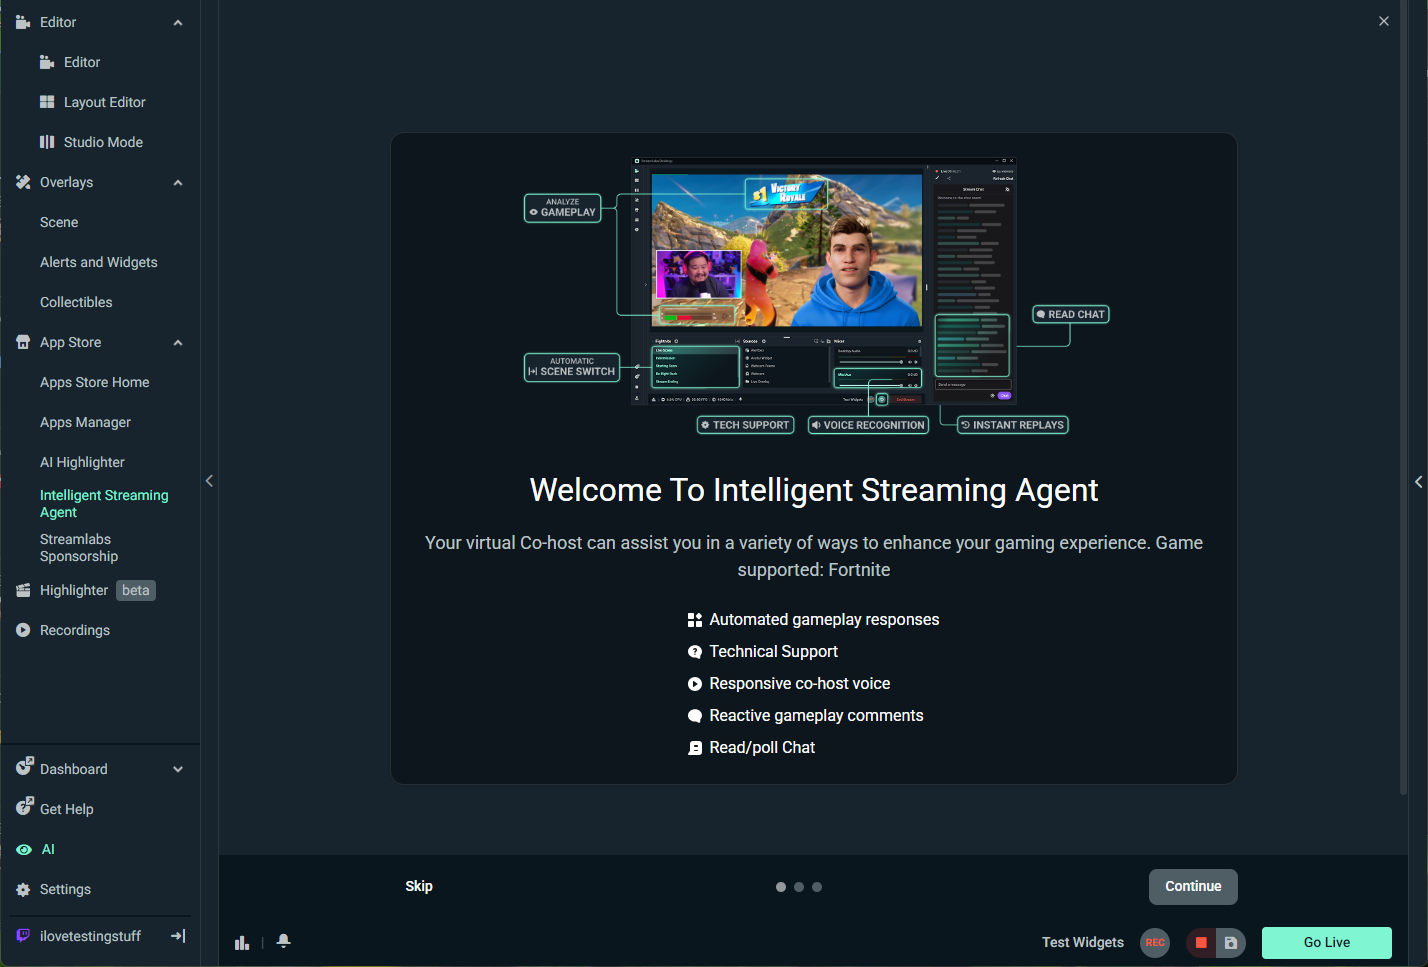
Step 4: On first launch, the Intelligent Streaming Agent app displays a welcome guide. The first screen shows you what the agent is capable of. When you’re ready, click Continue to go to the next step (recommended) or click Skip to jump straight into the Agent settings (jump to Setting up Automations with Producer for next steps).
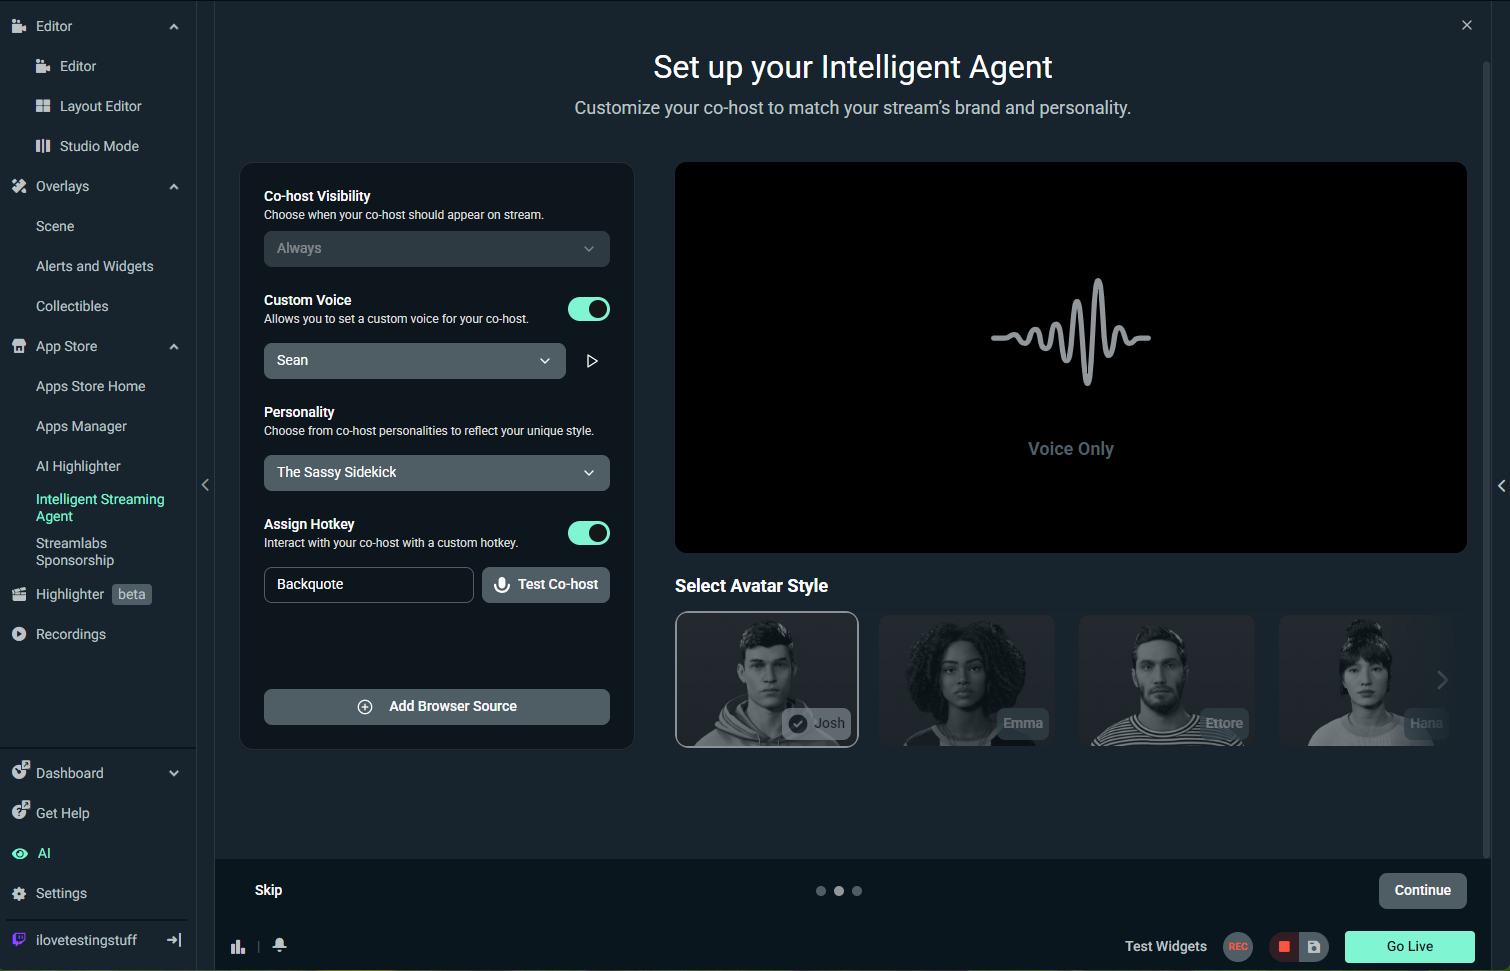
Step 5: On the second screen you can choose when your co-host is visible or if you want to use the Agent in voice-only mode.
You can set a custom voice and personality at this stage and can also set the hotkey you want to use for interacting with your co-host and test the responses as well.
Note: Previewing voices and testing responses does count toward your interaction limit.
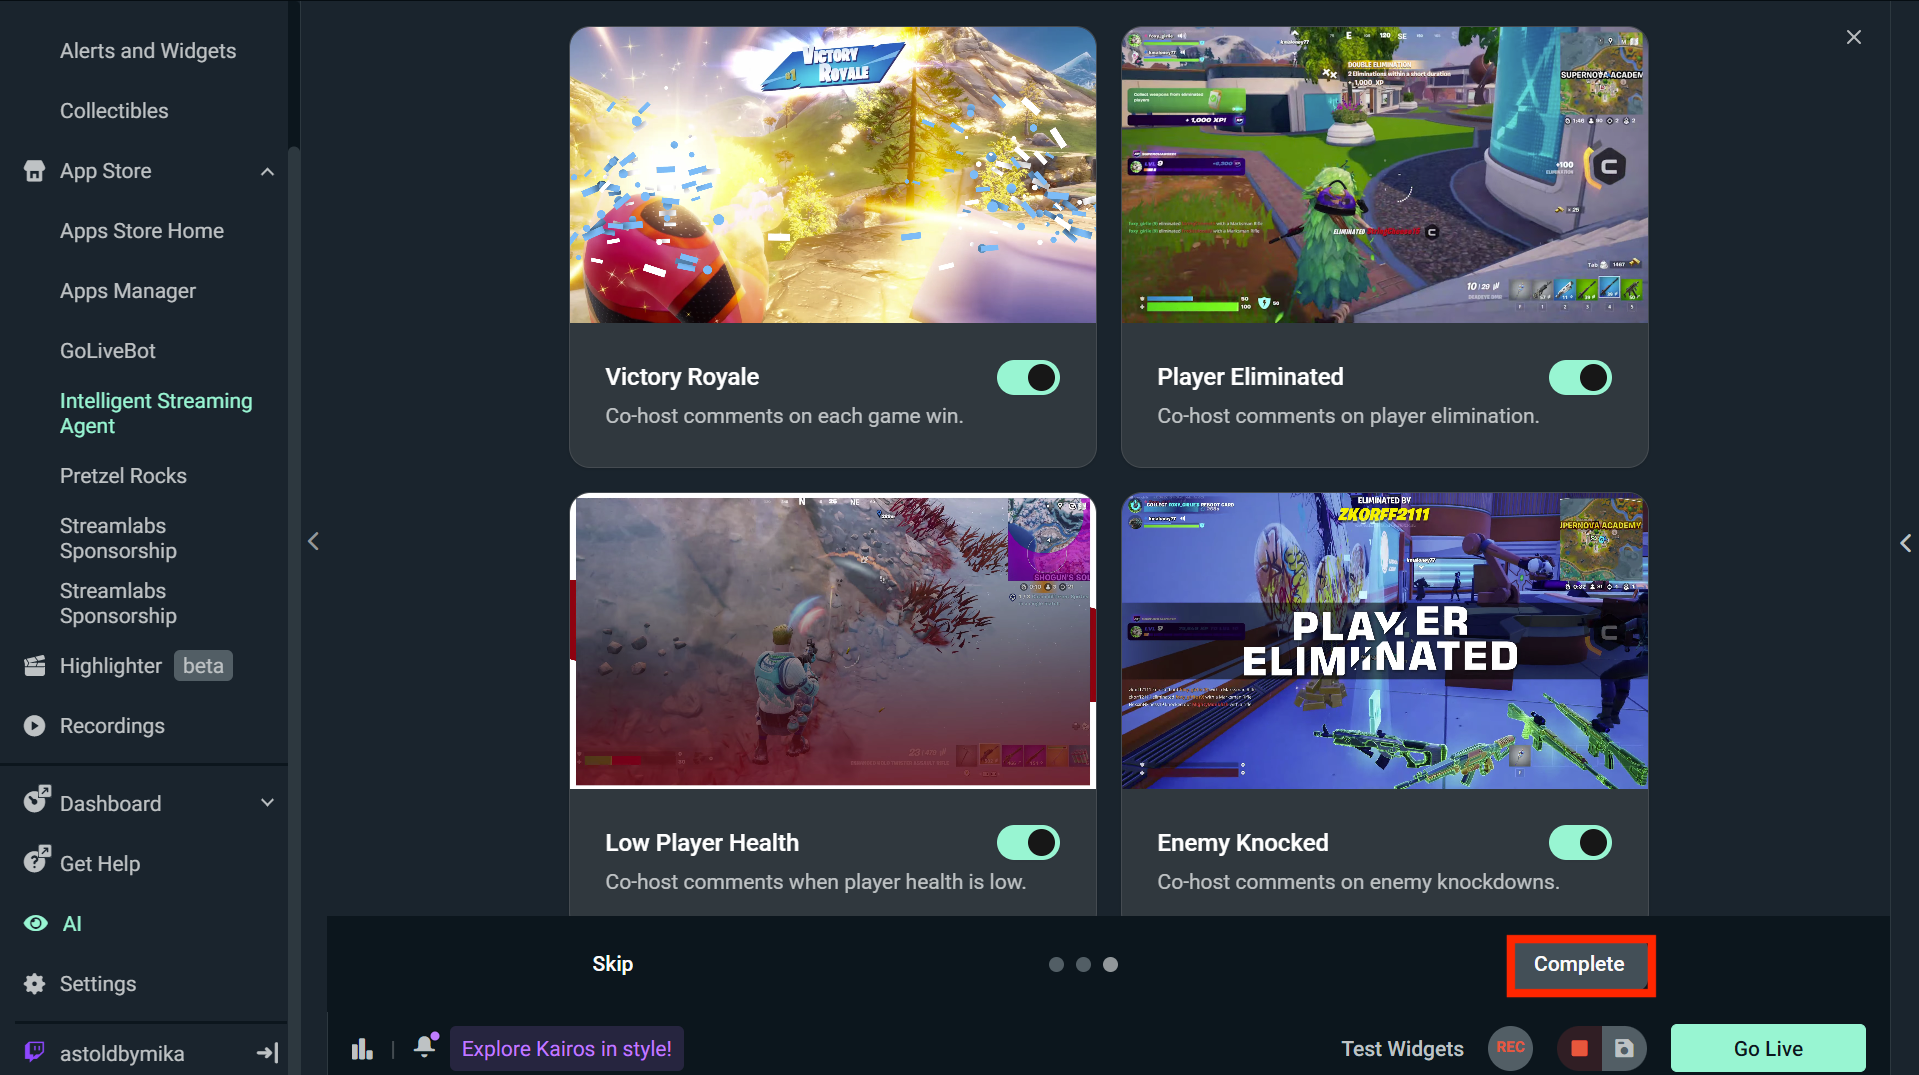
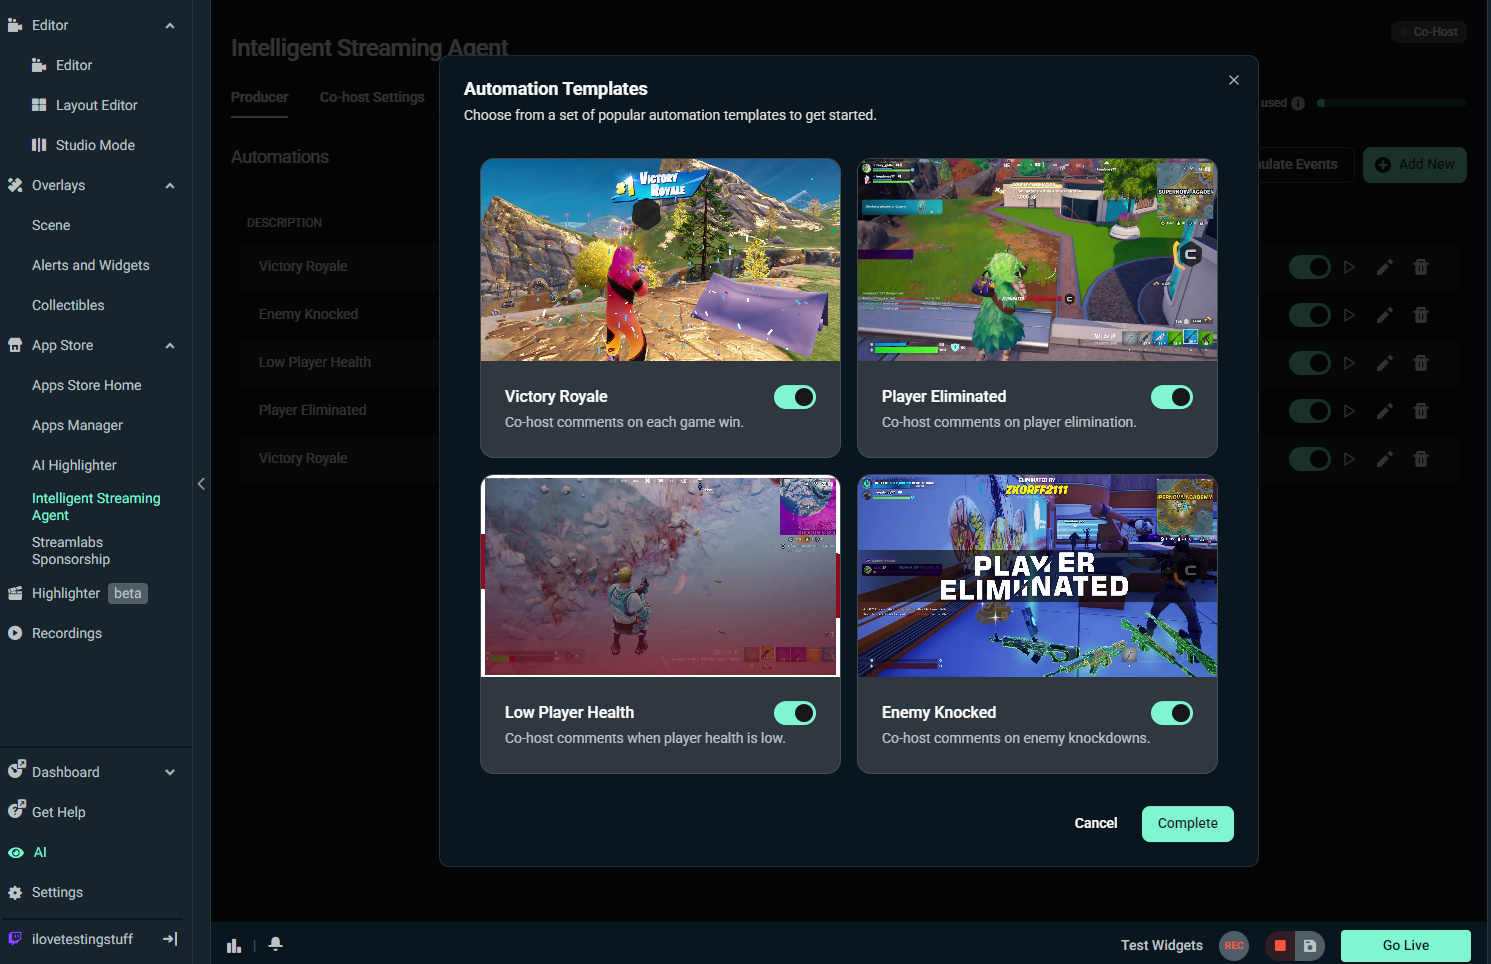
Step 6: On the final screen you can choose from a selection of pre-made Fornite automations to use with your agent. We’ll walk you through how to create custom automations later in the guide.
Toggle off any automations you don’t wish to include and click Complete to automatically add the Agent to your stream as a source.
Step 7: At this point, you can go live and your agent will begin interacting and any automations you set up in the previous step will work. However, we recommend further customizing your Agent using the Producer, Co-host, Chat, and Settings tabs as outlined below.
Setting up Automations with Producer
With Producer settings, you can set up automations—custom actions like switching scenes, commenting, and clipping—to trigger as a result of in-game events like low reaching health or winning a round. The free version of the Agent allows you to enable up to 5 automations simultaneously, while Streamlabs Ultra bumps that up to 10 automations. Keep reading for instructions on how to set up your own automations.
Step 1: Open the Producer tab.
Step 2: Click Add New and select New from scratch or New from template.

If you select New from template, a few options for Fortnite will be shown to pick from. These should look familiar if you walked through the onboarding steps. You can add all of the automations with one click or select just the ones you like most.
If you are starting from scratch, you will need to:
- Name your automation.
- Choose which game you want to create an automation for.
- Choose what condition will trigger the automation (like game started, low health, or player eliminated).
- Add reactions that happen when the condition is triggered. You can stack multiple reactions for the same trigger to make several things happen at once. Supported reactions Include:
- Switch to Scene—your active scene on Desktop will be switched to another one if you have multiple scenes set, for example from live scene to intermission, etc.
- Hide Source—source is hidden from active scene (visible prior to event).
- Show Source—show source in active scene (hidden prior to event trigger).
- Save Replay—save replay buffer from that moment that you can then replay in another scene or save video to share on social media later.
- Wait—wait a set amount of time between actions.
- Co-host Comment—co-host gives verbal remarks triggered by a specific event you set.
- Co-host Instruction—co-host gives verbal instructions such as “stay away from the storm”.
- Click Create automation when done to save your new creation.
.png)
Step 3: Once you have automations set up, you can:
- Use the toggle to turn an automation on or off.
- Click the play button to test an automation.
- Click the pencil icon to edit an automation.
- Click the trash can icon to delete an automation.
.png)
Step 4: You can now go live and your enabled automations will be active during your stream as long as the Agent is enabled in the Settings tab of the Intelligent Streaming Agent app.
Customizing Your Co-host
You can customize your co-host to look, sound, and behave how you want under the Co-host tab with Preference, Personality, and Quality settings.
Preferences
First is the Preferences tab. Here you can set the basic settings for how your co-host appears and how you interact with it.
.png)
Co-host Mode
By default, your co-host will be in Voice Only mode. You can leave this as-is or change the Co-host Mode to Avatar Always Visible so that it is always visible on your stream or Avatar Appears when Speaking so it shows up only when it's speaking to you.
Push to Talk
If you want to be able to speak to your Agent and have it respond, toggle Enable Microphone Hotkey to on and set your Push to Talk Hotkey by clicking the Backquote option and then clicking your preferred hot key. You can also change your Input Device here, if needed.
Reminders
The Agent will remind you if you're either muted or speaking quietly. You can adjust the Speaking Threshold, time between reminders, or toggle reminders off under this section.
Responses
With Responses you can choose to have your agent respond verbally to different Streamlabs Alerts including tips, subs, follows, bits, merch sales, charity donations, and raids.
Polls
With Polls you can say "Start a poll" followed by what you want your poll to be. The Agent will automatically read chat and inform you of the results once your poll has closed. Set the Poll Duration to choose how long your poll stays open.
Summarization
If you step away or are too busy to read chat, your agent can summarize chat for you. You can enable or disable this feature and choose how many messages the Agent should include in its summary.
Personality
You can change how your co-host sounds and acts under the Personality tab with the following settings.
.png)
Name
Give your co-host a custom name.
Personality
Choose from a variety of personalities to reflect your unique style. Your co-host can be a supportive wholesome buddy, a deadpan grinder, or if none of the pre-sets sound right, you can select Custom at the bottom of the list and check which traits you want to define your co-host's personality.
Custom Voice
Your co-host will come with a voice designed to match their look. If you want to change the voice, toggled Custom Voice on and select a new voice. You can preview the voices by pressing the play arrow to the right of the dropdown, but be aware that each voice preview counts as an interaction toward your interaction limits.
Quality
You can adjust graphics and audio settings for your co-host under the Quality tab where you can change graphics settings and quality along with audio settings. You won’t need to worry about adjusting any graphics settings if you are using the co-host in voice-only mode.
.png)
Graphics Settings
Here you can set the resolution your co-host displays at, enable DLSS, and set the max FPS for your agent. Higher settings will look better, but require more processing power, so you may need to experiment to find the right balance here.
Audio Settings
You can set the master volume for your co-host’s voice here.
Graphics Quality
You will find a number of graphics settings here to fine-tune how your agent appears. You can choose between Low, Medium, High, Epic, and Cinematic. Similar to the other graphics settings, higher values will look better but may come at a performance cost. You can set the quality options for:
- Anti-Aliasing
- Shadows
- Global Illumination
- Reflections
- Post Processing
- Texture
- Shading
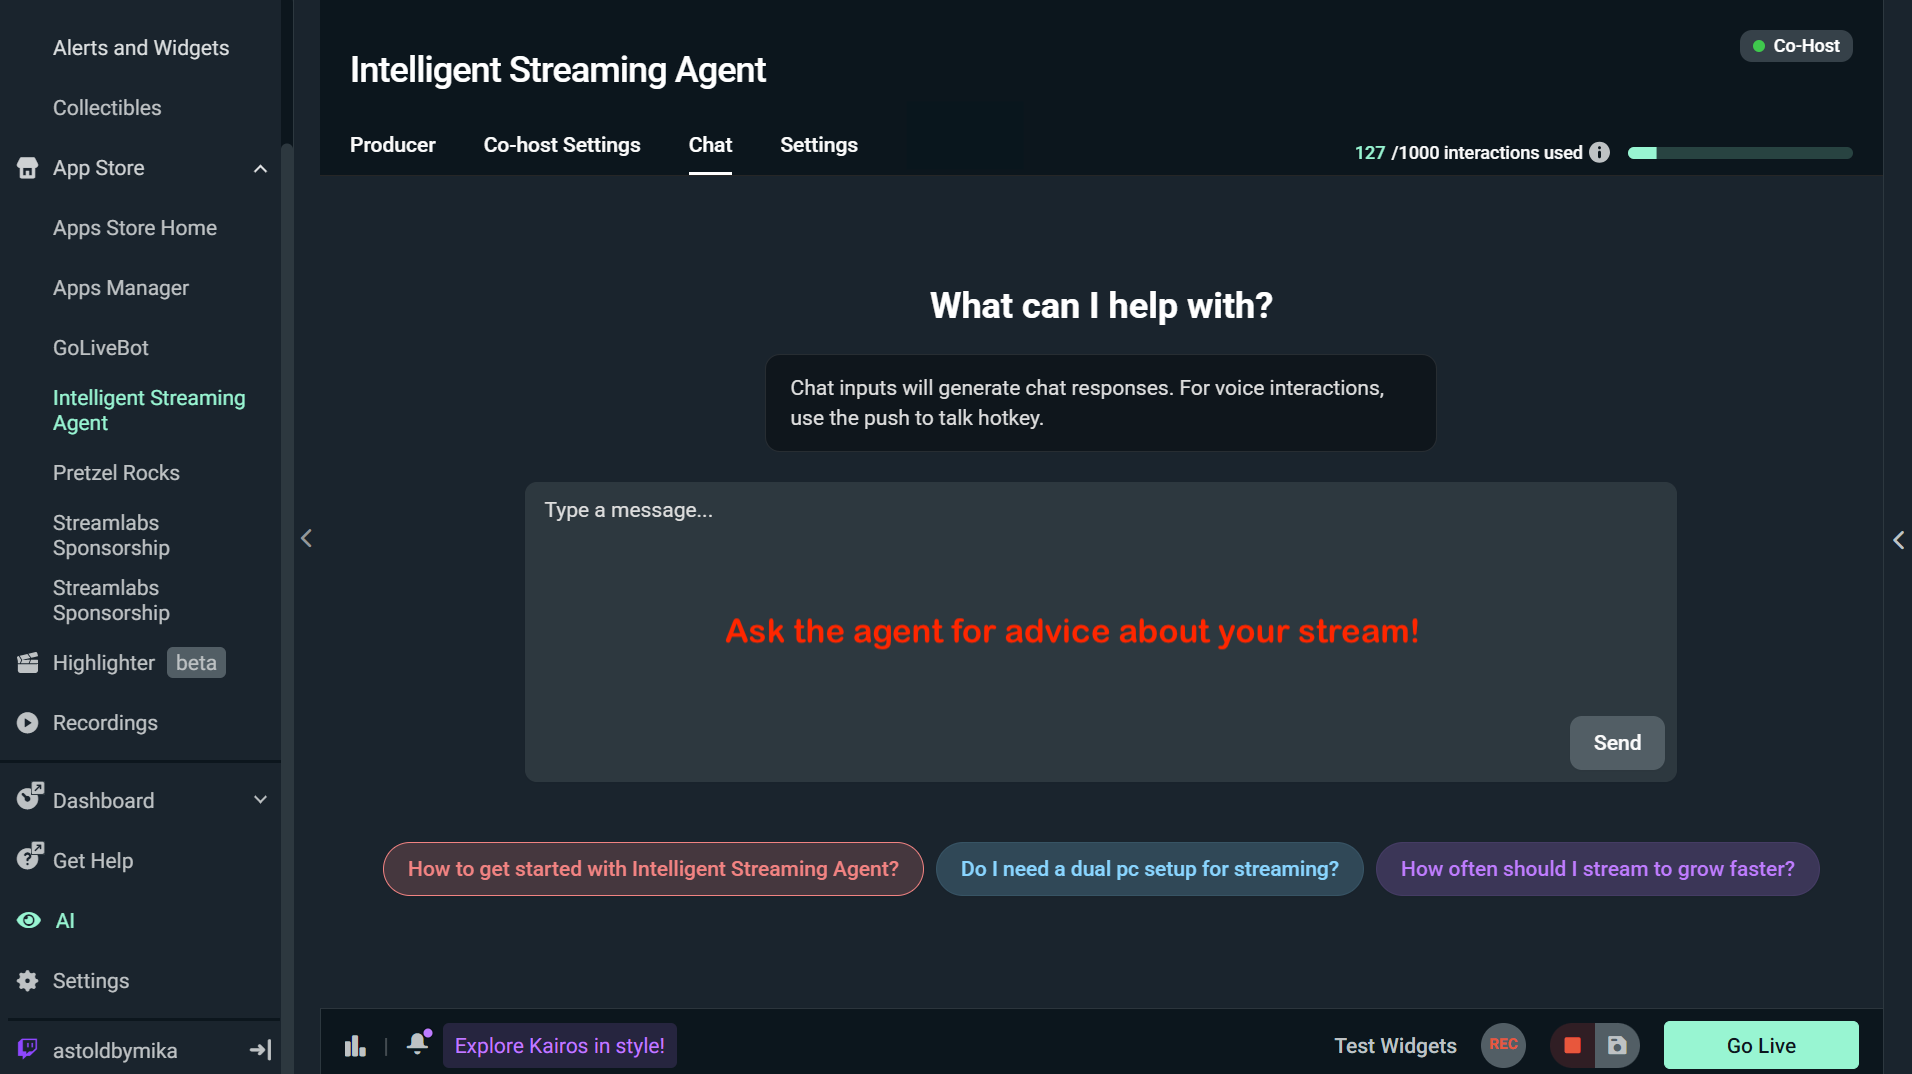
How to Chat with the Agent
Click on the Chat tab to use the built-in chat to talk to the agent even when you're not streaming. Ask anything from how to improve the audio quality of your stream and other technical questions to advice on how to grow your stream.
Other Settings
You’ll find a few other settings in the Settings window including:
Intelligent Streaming Agent toggle—turn the toggle on to enable Intelligent Streaming Agent functionality for your stream or toggle it off to disable the Agent.
Active Game Process—manually choose the game process your Agent should be watching in the event the game is not automatically detected.
.png)
Going Live with the Intelligent Streaming Agent
Once you have the Streaming Agent set up as desired, simply go live with a supported game. Once you start streaming, the Agent will monitor your gameplay, respond to triggers, and assist with troubleshooting in real-time.
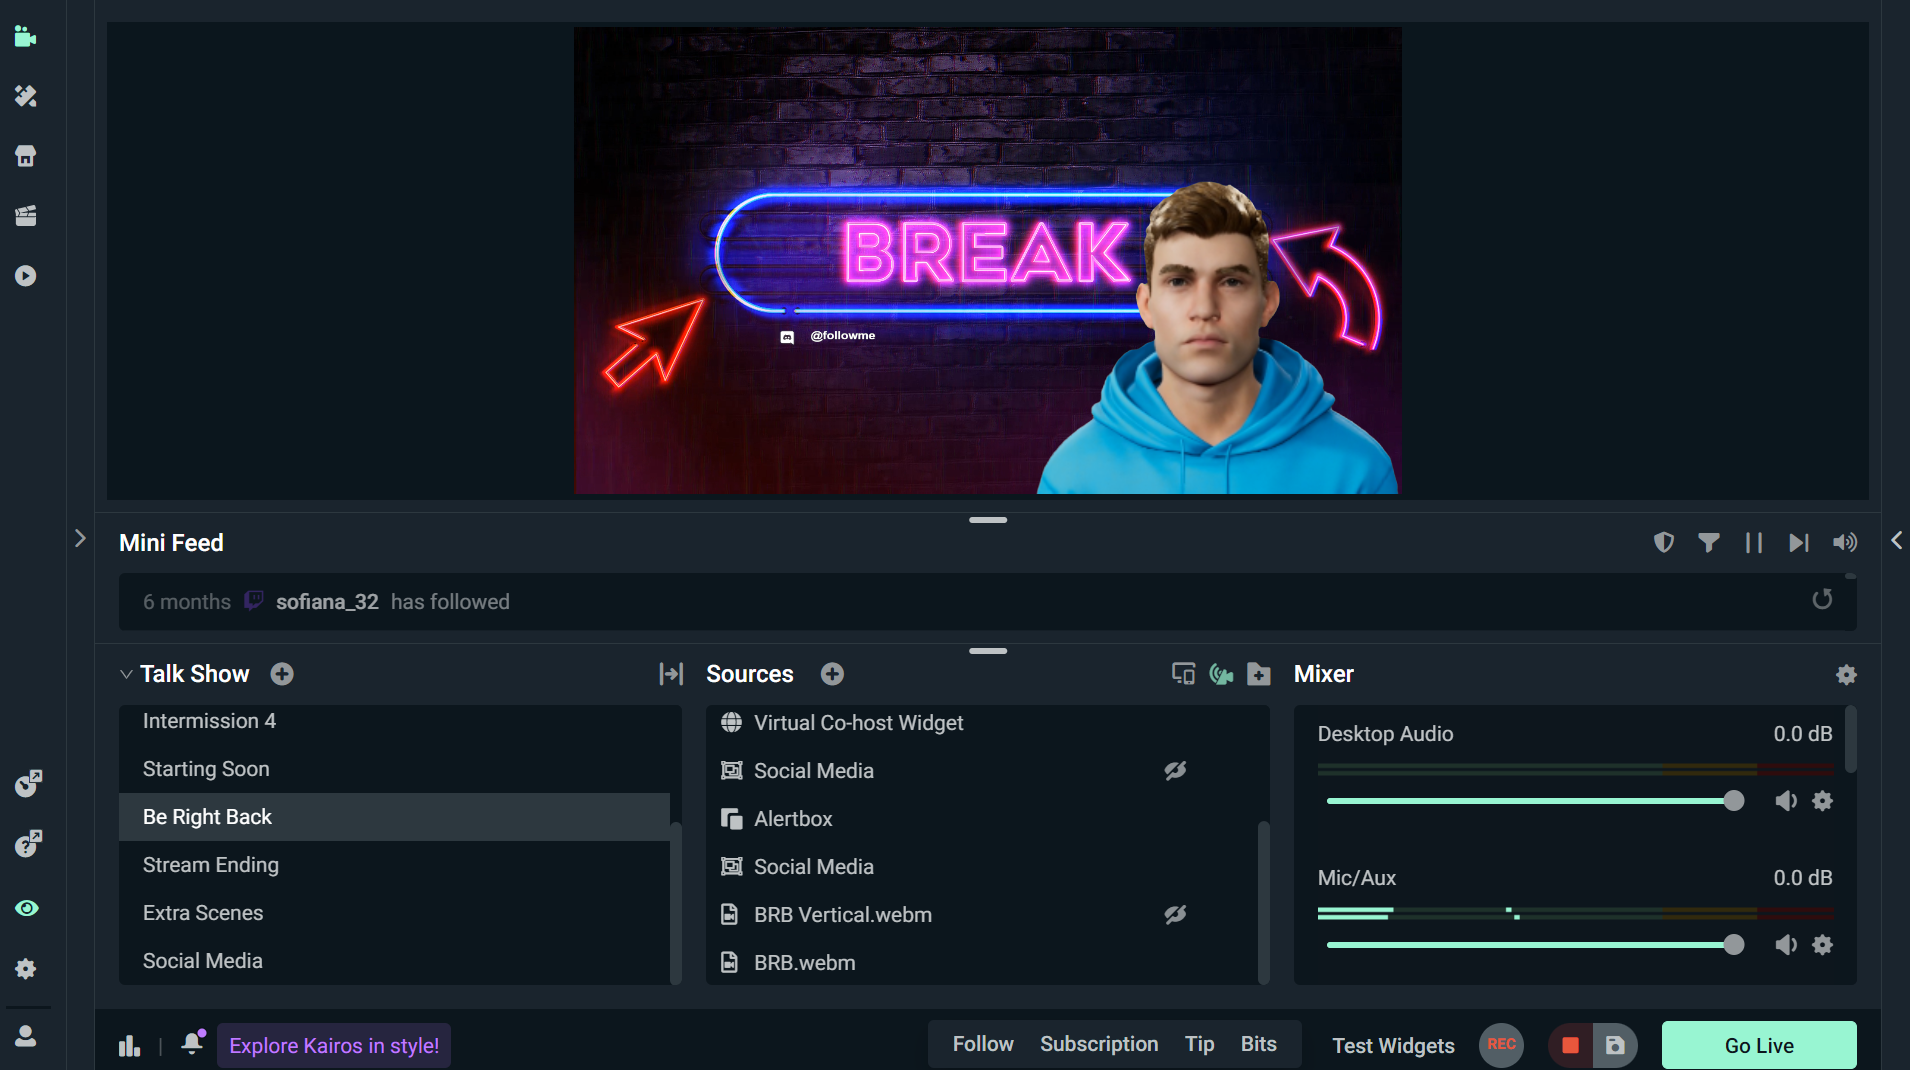
Note that you must be streaming/playing a supported game for the co-host to work as intended. If you notice that you can’t see or hear the Agent on your stream, ensure you have it added as a source by clicking the + icon above your Sources menu and adding the Virtual Co-host Widget under Apps.
The Intelligent Streaming Agent is here to make streaming smarter, not harder. Use your avatar as a hype co-host, hands-off producer, or real-time support. The Agent is built to help you focus on what matters: creating great content. Try it out in your next stream and see how much lighter your workload feels.
If you run into any issues with the Agent, check out our troubleshooting guide or get support by contacting us or joining our Discord server.
Streamlabs Intelligent Streaming Agent FAQs
What can the Streamlabs Intelligent Streaming Agent do?
It can cohost your stream with an interactive 3D avatar, act as a behind-the-scenes producer (scene switching, replays, clips), and help troubleshoot tech issues.
Will the Intelligent Streaming Agent work with AMD GPUs?
Yes, but with limitations. Avatars on screen are not supported with AMD GPUs. However, all other functionality (such as audio-only mode, automations, etc.) will still work.
What games and events does the Intelligent Streaming Agent work with?
The Intelligent Streaming Agent currently works with Fortnite, Valorant, PUBG, and Counter-Strike 2 with more titles in the works. Events are outlined below.
Supported Automation Events for Fortnite:
- Game Started
- Deployed
- Game Ended
- Low Health
- Has Shield
- No Shield
- Victory Royale
- Player Eliminated
- Player Knocked
- Storm Closing
- Enemy Eliminated
- Enemy Knocked
- Enemy Elimination Count
- Players Remaining (coming soon)
Supported Automation Events for Valorant:
- Round Started
- Low Health
- Victory
- Player Eliminated
- Enemy Eliminated
- Enemy Elimination Count
Supported Automation Events for PUBG:
- Game Started
- Deployed
- Storm Closing
- Game Ended
- Victory
- Player Eliminated
- Player Knocked
- Enemy Eliminated
- Enemy Knocked
- Enemy Elimination Count
- Players Remaining (coming soon)
Supported Automation Events for Counter-Strike 2:
- Round Started
- Low Health
- Victory
- Player Eliminated
- Enemy Eliminated
- Enemy Elimination Count
- First Half
- Second Half
- Round Won
- Round Lost
- Game Ended
Do I need to use the 3D avatar to use the Agent?
No. The avatar is optional. You can use the Agent in voice-only mode as a co-host, producer, and tech support in the background.
How does the Free plan work?
- Starter pool: 100 total interactions. This is a one-time pool that counts down and does not reset monthly.
- Automations: Up to 5 active automations. When you reach the limit, you will see an in-app prompt to upgrade to Ultra.
What does Ultra include?
- Monthly interactions: 1,000 per calendar month.
- Automations: 10 active automations. You can have many more automations added but 10 toggled on simultaneously.
What are automations?
Automations are actions that take place on your stream as a reaction to a trigger you set. For example, you can set up an automation with a trigger of a Victory Royale that reacts by switching to a specific scene, captures a clip, and having your Agent comment on your success.
What is an interaction?
An interaction is any response from the Agent, either by text or voice. For example, if you type a question into chat, the Agent's answer counts as an interaction. If you ask it to change scenes, that also counts-unless it happens through an automation without the avatar commenting, in which case it does not. Actions like switching scenes or clipping highlights on their own are not interactions unless the Agent responds verbally or via text.
Do interactions roll over on Ultra?
No. The counter resets at the start of each calendar month.
Do automations consume interactions?
Automations do not count toward your interaction limit unless the automation is specifically set to have the avatar respond with text or voice. For example, an automation that switches scenes or triggers a clip will not consume interactions on its own, but an automation that makes the avatar comment on the event will.
Do interactions count in voice-only mode when the avatar is off?
Yes, when the Agent replies by text or voice, it counts as an interaction whether the avatar is visible or the Agent is running in voice-only mode. Automations with no Agent reply do not count. If you don't want interactions to occur during a specific stream, toggle Intelligent Streaming Agent off in settings.
Where can I see my usage?
In Streamlabs Desktop, the Agent panel shows a usage counter. Free displays interactions remaining. Ultra displays interactions used in this cycle.
What happens if I downgrade from Ultra?
Downgrades take effect at the end of the calendar month. If you return to Free, your original Free starter pool does not reset.
Can I buy a one-time interaction add-on?
Not at launch. We are evaluating options for high-volume creators.
Will limits change over time?
Yes. We plan to tune limits based on real usage, cost, and feedback. If limits change, we will update this article and the in-app counter.
Do developer SDK calls count toward Agent interactions?
Agent interactions apply to features in Streamlabs Desktop. Developer usage of Streamlabs AI will be documented separately.
Why start with a smaller Free pool?
We are launching conservatively to learn from real usage and keep the Agent responsive for everyone. If most users are hitting limits, we may increase the Free pool.