
Today, we will quickly cover how to import commands and other features from StreamElements Chatbot, Nightbot, and the Desktop into Streamlabs Cloudbot. Adding a chat bot to your live stream is a great way to give your viewers a way to engage with the stream. Streamlabs Cloudbot comes with interactive minigames, loyalty, points, and even moderation features to help protect your live stream from inappropriate content and supports Twitch, YouTube, Trovo, and Kick.
We've built easy-to-use importers to make it easy for you to move to Streamlabs Cloudbot without losing work you've put into setting up another bot.
In this guide you will learn:
- How to Import StreamElements Chatbot to Streamlabs Cloudbot
- How to Import Nightbot to Streamlabs Cloudbot
- How to Import the Desktop Streamlabs Chatbot to Streamlabs Cloudbot
If you’ve already set up Nightbot and would like to switch to Streamlabs Cloudbot, you can use our importer tool to transfer settings quickly.
How to Import StreamElements Chatbot to Streamlabs Cloudbot
If you're moving from the StreamElement Chatbot to Streamlabs Cloudbot, you can do so in just a few clicks using the Cloudbot importer tool.
Step 1: Log into your Streamlabs Dashboard, click on Cloudbot in the left hand panel, and choose settings. Alternately, click here to be taken directly to the Cloudbot settings page.
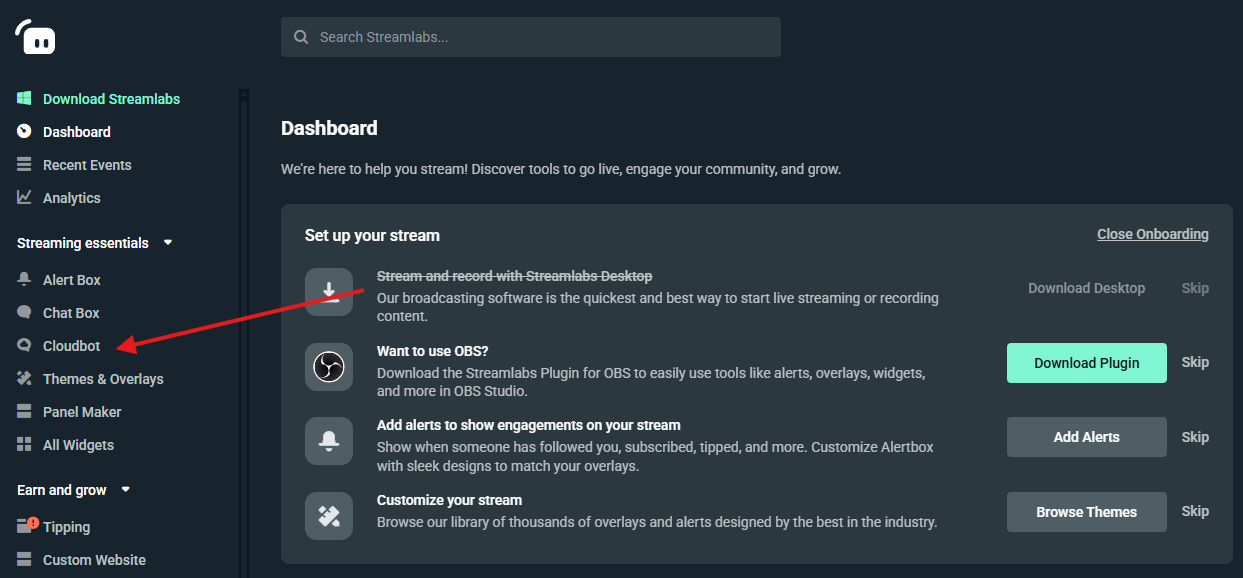
Step 2: Within the settings, click the Import button next to StreamElements (Commands, Timers, Loyalty, Banned Words).

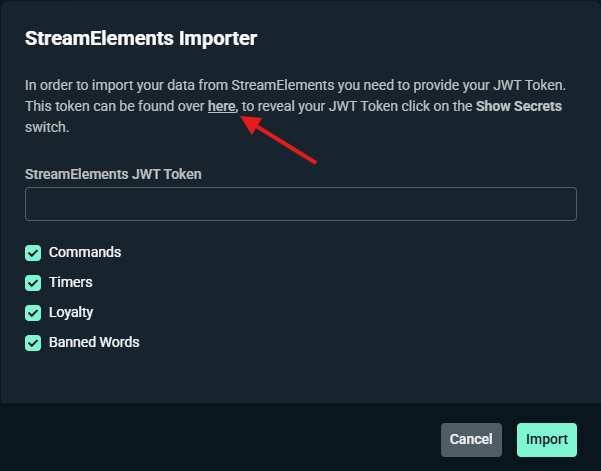
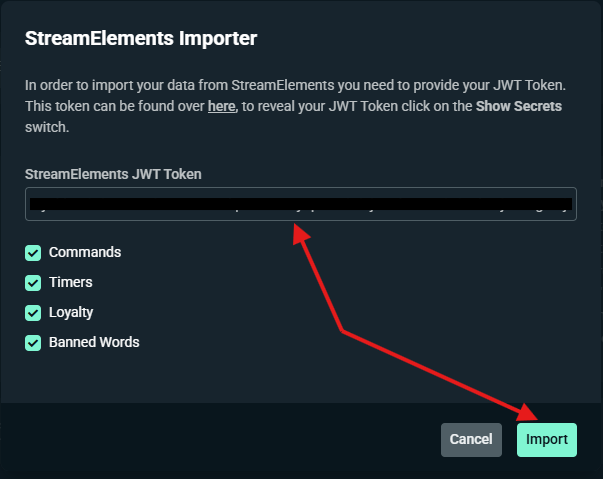
Step 3: You will now need to get your JWT Token from StreamElements. Click the link that says here in the popup or click here to visit your StreamElements Channels page.
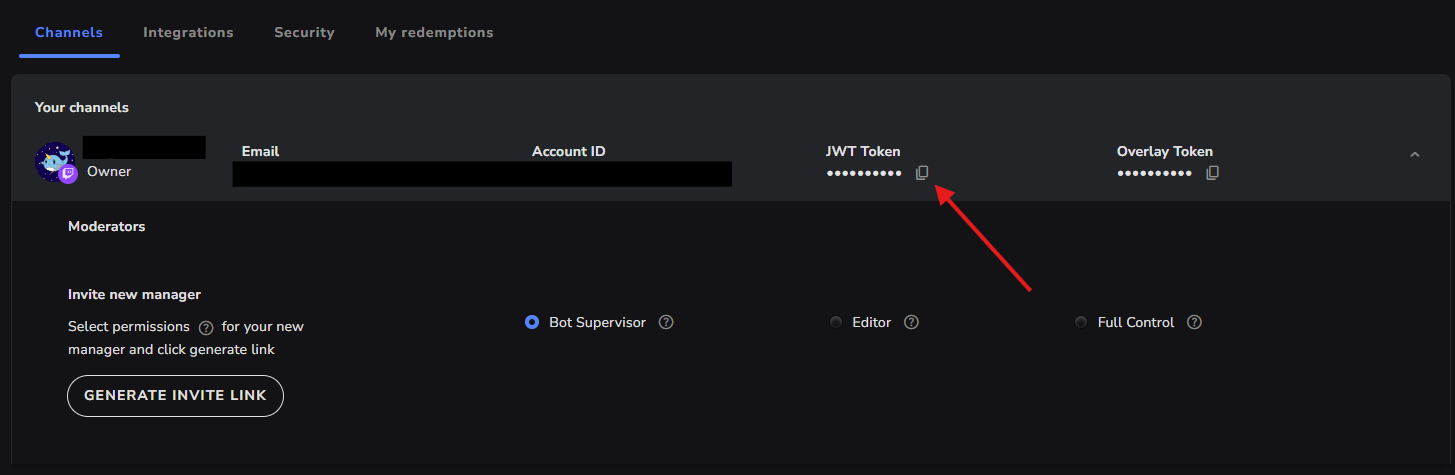
Step 4: On your StreamElements Channel page, click the copy icon under JWT Token to copy your token and return back to the popup within your Streamlabs Cloudbot settings from the previous step.
Step 5: Paste your JWT Token into the field and click Import. You will receive a popup confirmation that your settings are being imported.
Note: This process can take several minutes to finalize.
How to Import Nightbot to Streamlabs Cloudbot
Importing Nightbot into Streamlabs is incredibly simple with the importer functionality built in to Cloudbot.
Step 1: Log into your Streamlabs Dashboard, click on Cloudbot in the left hand panel, and choose settings. Alternately, click here to be taken directly to the Cloudbot settings page.
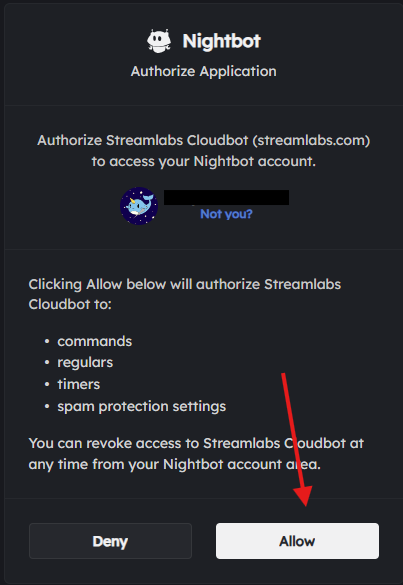
Step 2: Within the settings, click the Import button next to Nightbot. This will take you to Nightbot so you can authorize Streamlabs Cloudbot to access your Nightbot account. This will provide Streamlabs Cloudbot with access to commands, regulars, timers, and spam protection settings.

Step 3: Click Allow. You will receive a popup confirmation that your settings are being imported.
Note: This process can take several minutes to finalize.
How to Import the Desktop Streamlabs Chatbot to Streamlabs Cloudbot
If you've been using the Streamlabs Chatbot desktop application and are ready to make the move to Cloudbot, you can do so in a few simple steps.
Step 1: Open the Streamlabs Chatbot desktop application.
Step 2: Open the connections window.
Step 3: Click on Streamlabs.
Step 4: Make sure your desired Streamlabs account is connected.
Step 5: Click on Open Desktop to Cloudbot Exporter to launch the exporter window.
Step 6: Select which data you wish to export.
Step 7: Click Export and wait for the bar to fill completely.
We hope you found these import instructions useful! If you have any questions or comments, please let us know by contacting us or joining our Discord server.