What is NDI?
NDI (Network Device Interface) is a technology developed by NewTek that allows video, audio, and data to be transmitted over a local area network. NDI is designed to facilitate the transmission of high-quality, low-latency video and audio between devices and applications without the need for complex hardware setups. Simply put, it’s a way to send video and audio without cables.
Why Would I Use NDI with Streamlabs Desktop?
There are various reasons why you might want to use NDI with Streamlabs Desktop, including:
- Multi-camera production: If you have multiple cameras capturing different angles of your content, you can use NDI to bring those feeds into Streamlabs Desktop and switch between them as needed.
- Remote guests: If you have remote guests who want to join your stream, you can use NDI to bring their video and audio feeds into Streamlabs Desktop without the need for complex hardware setups.
- Integration with other production tools: NDI allows you to easily integrate Streamlabs Desktop with other NDI-enabled devices and applications, such as video switchers and graphics systems.
- Lower CPU usage: Using NDI to send your Streamlabs output to another computer can reduce the load on your streaming computer's CPU, which can result in a smoother streaming experience.
- Greater flexibility: NDI offers a great deal of flexibility in terms of how you can configure and route your video and audio feeds, making it a versatile tool for many different streaming workflows.
- Improved video production: With NDI, you can create high-quality, dynamic live streams for things like webinars, sporting events, ceremonies, church or house of worship events, classroom activities, and more.
How to Set Up NDI for Streamlabs Desktop
Streamlabs Desktop is only able to receive an external NDI stream as a source. Therefore, you need another application that is capable of capturing and sending out an NDI stream on your local network. You will first need to set up your output in order to set up your reception. For output, see our articles on sending NDI in OBS Studio or Create NDI stream with Scan Converter 2, vMix, or Mobile Device.
1. Install NewTek NDI Tools
To get started with NDI streams and sources, you'll need to have NDI Tools installed on the computer with which you want to use Streamlabs Desktop to receive an NDI stream or on the computer you are using to create and send an NDI stream. After installing the NDI Tools, reboot your computer.
*Some computers may not be powerful enough to run NDI Tools, so be sure to check the system requirements.
Firewall or Antivirus restrictions will cause issues. If you are encountering issues receiving an NDI stream with Streamlabs Desktop, make sure the application generating the NDI stream is allowed through your firewall. For Windows, whitelist NDI_ScanConverter in your Windows Defender Firewall settings.
The file path for this will generally be: C:\Program Files\NDI\NDI 5 Tools\Screen Capture.
See this article on how to open your firewall for various applications.
2. Setup to Receive an NDI Stream with Streamlabs Desktop
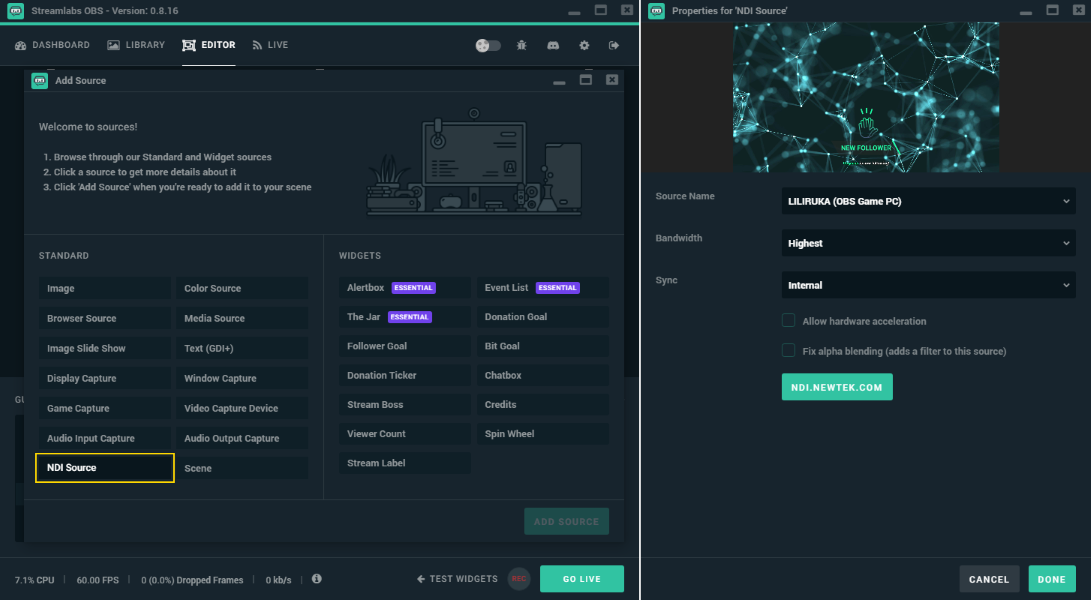
Once your local network contains one (or more) NDI streams, you can add them as a source in Streamlabs Desktop. Simply click the plus (+) icon above the sources to add a new source and select NDI Source. In the properties of the NDI source, select which NDI stream you want to receive and display. Active NDI streams on your local network are automatically detected.
Troubleshooting
NDI Feeds Aren’t Showing Up
If you aren’t seeing any available NDI feeds to select, this could be due to your firewall (as mentioned previously). Also, sometimes simply restarting Streamlabs Desktop will do the trick. If you have already opened your firewall and restarted Streamlabs Desktop, check to see if the NDI Screen Capture app is indeed running. If not, run the app, delete the source you just added and add a fresh NDI source. You should be able to see your feeds now.