It’s no secret that many live streamers wish to give their viewers nothing less than top notch quality, which is a reason why many creators wish to stream in HDR. HDR ( short for High Dynamic Range) content is a video type that provides a wide range of colors and contrast compared to SDR (Standard Dynamic Range) content. This allows for more vivid and true-to-life images, making the viewing experience more immersive and engaging for your audience. In this article, we will explain everything you need to know about live streaming HDR content to YouTube and how to do so using Streamlabs Desktop.
Things to Know About HDR Streaming to YouTube
Before diving into how to stream HDR to YouTube, it’s important to note that an HDR stream must be a live stream, not a Premiere. For HDR gaming content, you must play a game that supports HDR output (turn this on via the game’s settings) and use a monitor or TV that supports HDR and a compatible software encoder. For all other content, you need a compatible encoder and a camera that supports HDR video. Additionally, the stream must be sent via HLS (not RTMP).
Below is a complete list of configurations to remember for streaming HDR content to YouTube.
HDR Configurations
- Encoders must be set to a variable resolution bitrate (VBR) and not Constant Bit Rate (CBR) to be detected by YouTube
- Video Codec: HEVC
- Bit Depth: 10 bits
- Color Primaries: BT.2020 (must be compatible with your source)
- Transfer Characteristics: ST 2084 PQ or HLG, depending on which one your source produces
- Matrix Coefficients: BT.2020 Non-Const Y (must be compatible with your source)
HLS output:
- Segment Duration: between 1 and 4 seconds.
- Segment Format: must be TS (Transport Stream)
- Byte Range is not supported
- Must use a rolling playlist with no more than five outstanding segments
- Must use HTTPS POST/PUT
- Encryption is not supported besides using HTTPS
Compatible Software Encoders include:
- Avermedia RECentral 4
- AWS Elemental Live
- Mirillis Action!
Streaming HDR to YouTube Using Streamlabs: Required Settings
Video Color Format

- Head to the Advanced settings in Streamlabs Desktop. Select P010 for the color format, Rec. 2100 (PQ) for YUV Color Space, and Limited for the YUV Color Range.
- After updating the settings, click Done to save.
Game Capture Settings

- From your Sources panel, double-click your Game Capture source.
- Under the Game Capture Settings, be sure to change your Color Space to Rec. 2100 (PQ).
YouTube HLS Settings
Before changing the HLS settings in Streamlabs Desktop, you must make the appropriate changes on YouTube. Here’s how:
- Navigate to the Go Live section of your YouTube Studio.
- Under Stream Key > Select Stream Key, you want to change your stream key from the current setting to HLS by selecting the option from the drop-down. You will be provided with a new stream key and URL that you will need to use later.

- Next, open Streamlabs Desktop and open your Preferences/Settings and go to Stream.

- Under Service, change to YouTube - HLS for your service, Primary YouTube Ingest Server for the server, and input the new stream key you generated. When you’ve updated all information, select Done.
Encoder Settings

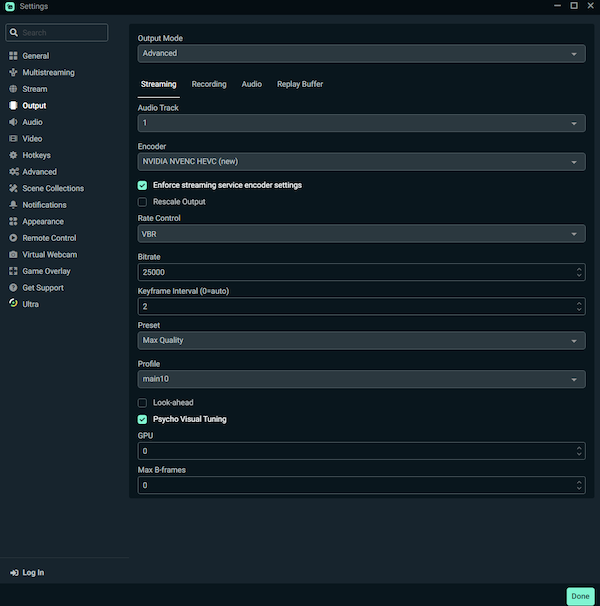
- In your Output Settings in Streamlabs Desktop, switch your Output Mode to Advanced.
- Next, select theencoder that you want to use.
- Reminder, your encoder must be set to a variable resolution bitrate (VBR) and not Constant Bit Rate (CBR) to be detected by YouTube, the video codec should be set to HEVC, and profile set to main10.
In addition to the configurations recommended by YouTube, it’s important to note that to stream HDR to YouTube using Streamlabs Desktop, you must use an NVIDIA graphic card that supports x265. While YouTube recommends GTX 10 or later for streaming HDR content, we recommend Nvidia RTX 20 series or later when using Streamlabs Desktop.
If you have more questions about streaming HDR content to YouTube, be sure to ask us on Twitter!